This is the first part of a series of blog posts about techniques to bypass web filters, looking at increasingly advanced techniques with each part.
Back in 2019 (yes, quite some time ago), I saw a Tweet1 about how SNI spoofing can be used to bypass web filters:
Ok, so SNI spoofing is cooler than I thought. It’s easy to bypass these deep packet inspection devices and Next Gen firewall filters.
Want to visit a “malicious” website? Getting blocked? Just change the SNI value to a windows update address.
Paul Seekamp @nullenc0de (Tweet)
I never heard about SNI spoofing before and so I was wondering what it is, how it works and how it can be used to bypass those pesky web filters. So, I did some research and experiments. If you want to have the answers to these questions, read along.
Bypassing web filters blog post series:
- Bypassing Web Filters Part 1: SNI Spoofing
- Bypassing Web Filters Part 2: Host Header Spoofing
- Bypassing Web Filters Part 3: Domain Fronting
- Bypassing Web Filters Part 4: Host Header Spoofing & Domain Fronting Detection Bypasses
A Short Introduction to Web Filters / Proxies
Before we start exploring the various techniques for bypassing web filters / proxies, I would like to provide a brief introduction to what web filters are and the different configurations they can have.
A web filter is a system that examines internet traffic, specifically HTTP and HTTPS requests, to determine whether a request is legitimate or should be blocked. These filters are often referred to as HTTP proxies. In many cases, web filters are integrated into firewalls (also known as application level firewalls, enterprise gateways, next generation firewalls, and the like), which have besides standard TCP/IP firewalling additional features like intrusion detection capabilities. A web filter can also be operated on a dedicated proxy which is only responsible for inspecting and filtering web traffic.
Web Filter / Proxy Modes
HTTP proxies can be operated in two modes: the “normal” mode, also known as “explicit” or “non-transparent” mode, and the “transparent” or “invisible” mode.
Normal / Explicit / Non-Transparent Proxy
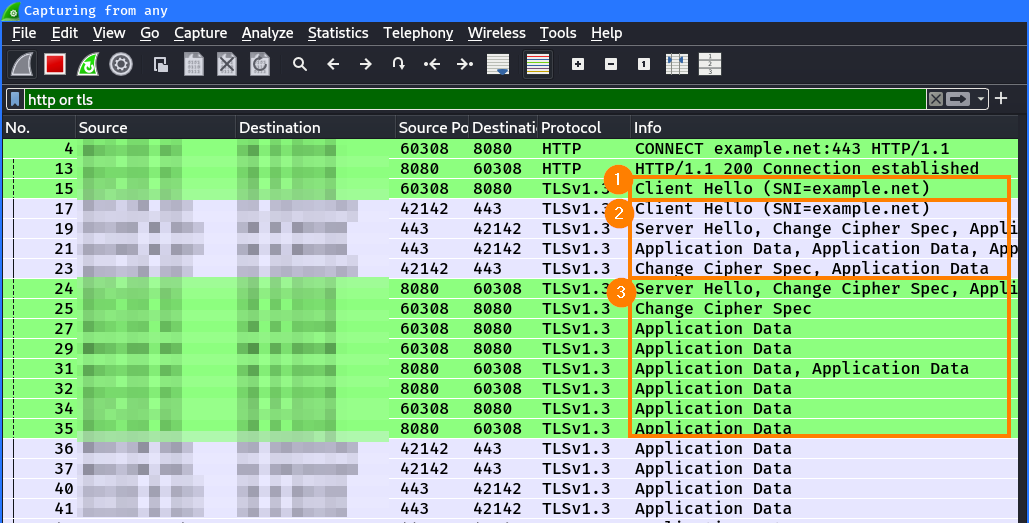
In normal mode, the proxy server acts as an intermediary between the client and the target website. When a client makes a request to access a website, a new connection is first established to the proxy. The client tells the proxy via the HTTP CONNECT method to which target website it wants to establish a connection. After confirming to the client that the connection was established, the proxy will forward requests to the target system and responses back to the client.
Interesting to know is also that the client does not perform any DNS lookups, it just sends the hostname to the proxy. The proxy will then perform the DNS lookup for the provided hostname.
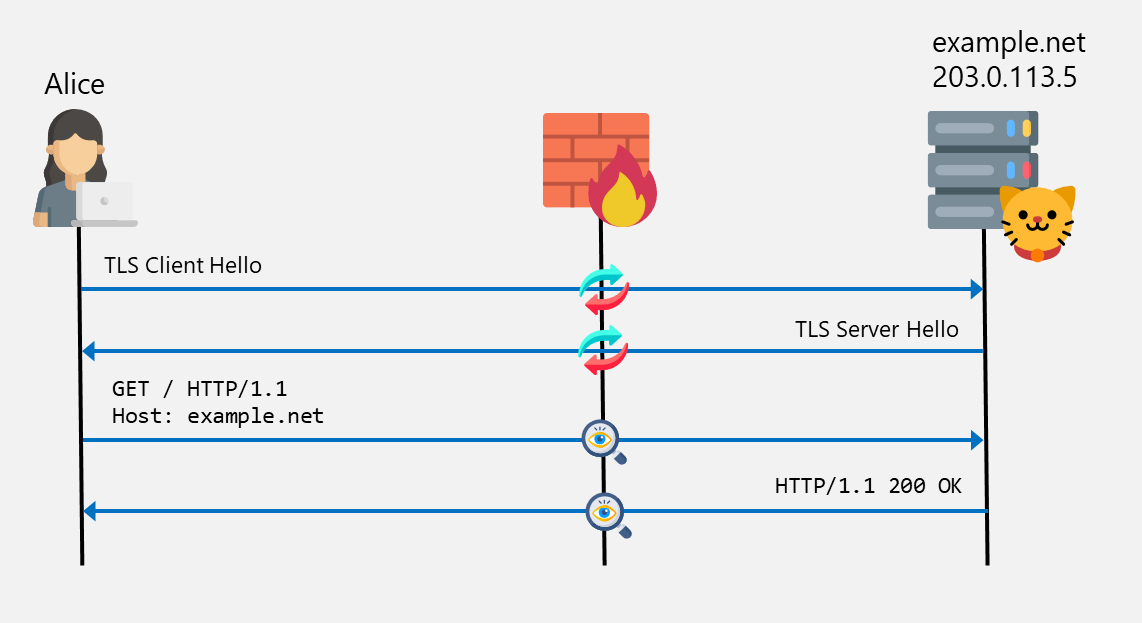
The following diagram shows an example where Alice connect via HTTP to example.net via a proxy. This proxy is configured on the client. The connection to the proxy is established via the HTTP CONNECT method. The proxy then connects to the target website. Further request and responses are forwarded between the client and website:
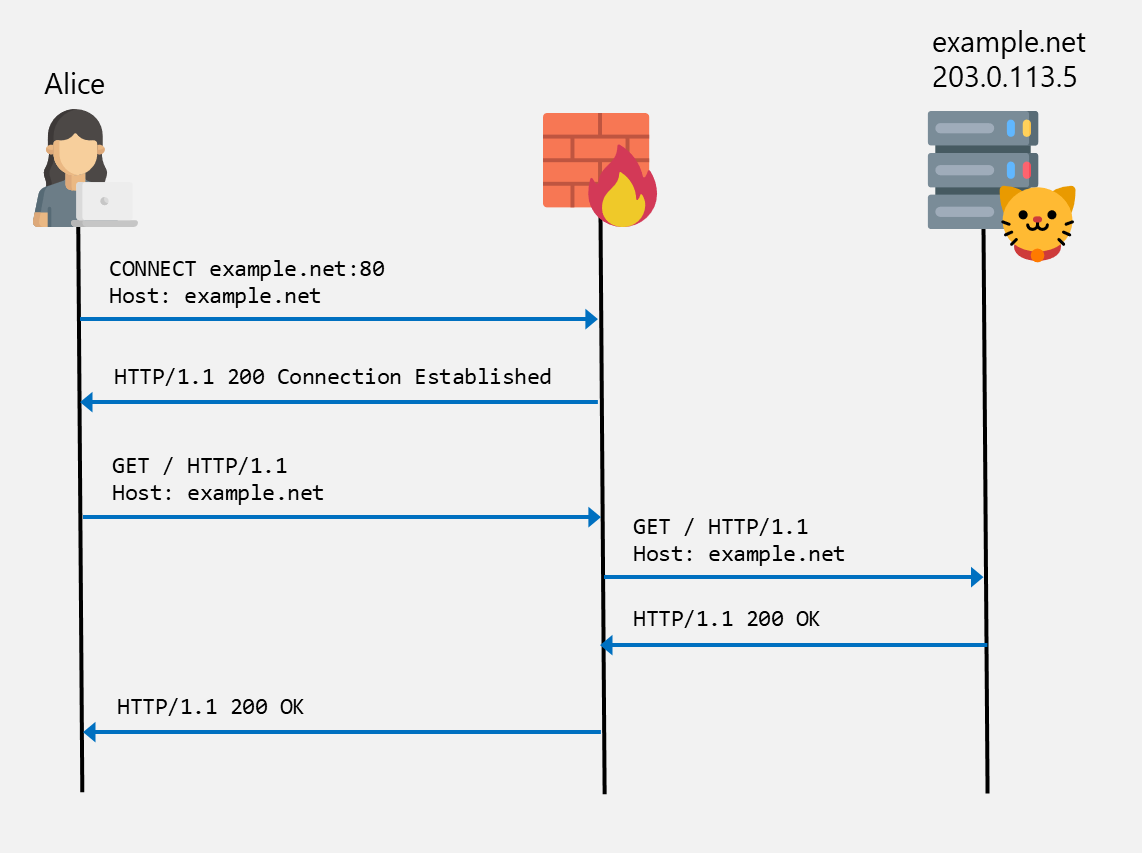
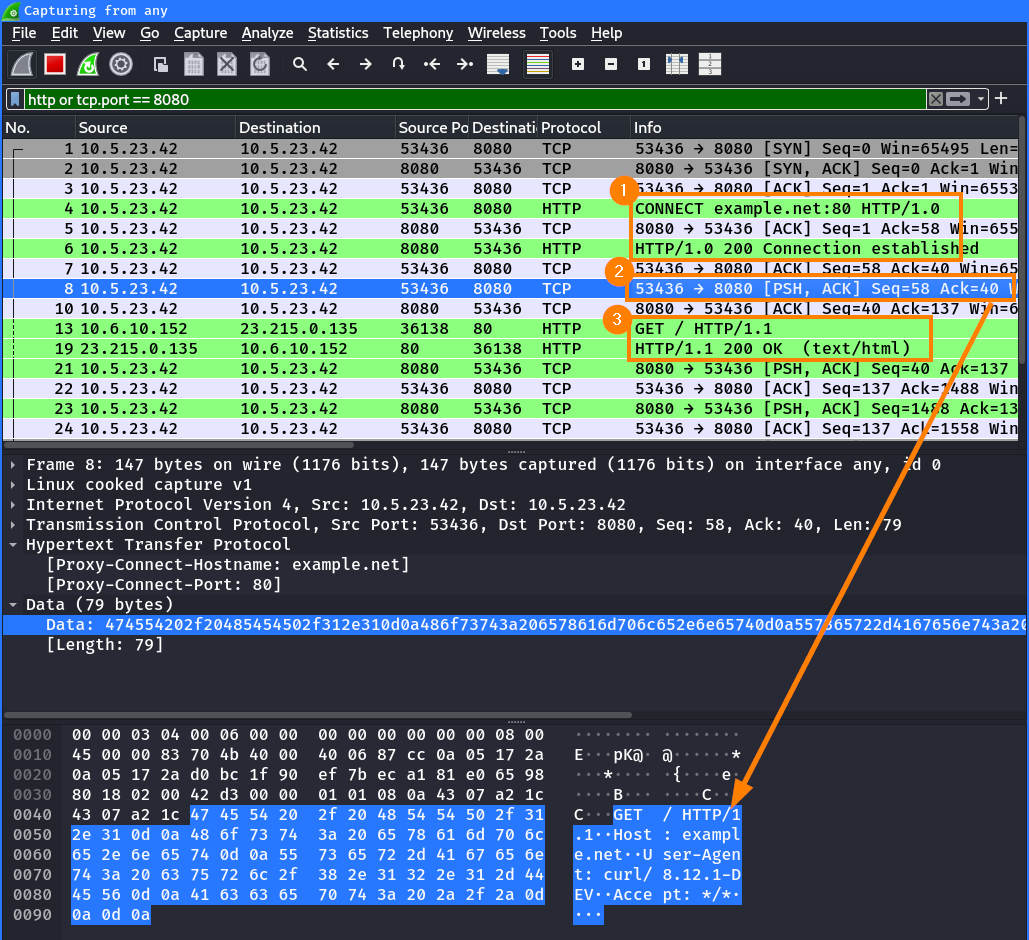
This can be seen in Wireshark as well. The client first establishes a connection to the proxy via the HTTP CONNECT method and tell the proxy the target server’s hostname ①. After the connection is established, the client sends an HTTP request to the proxy ②. This request and the according response are then forwarded between the client and server ③:
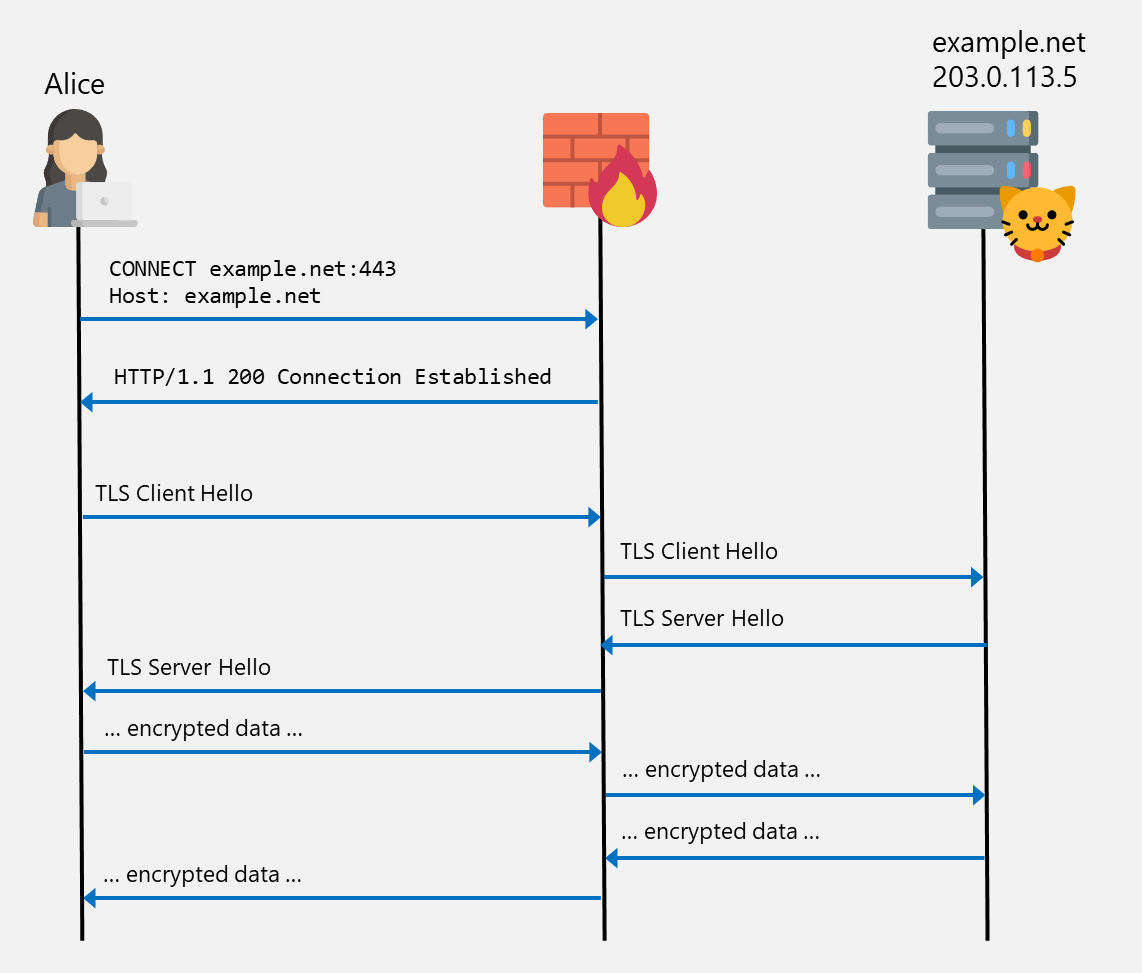
The same works when HTTPS / TLS is used. All TLS messages are forwarded to the target server after establishing the connection to the proxy via the CONNECT method. Since the TLS tunnel is established between the server and the client, the proxy cannot read the encrypted data.
Transparent / Invisible Proxy
In transparent mode, the proxy server intercepts the user’s requests without requiring any configuration on the client. Clients may not even be aware that the traffic is being sent through a proxy. The proxy server still processes the requests and responses, but it does so without altering the original request headers. This mode is often used in environments where administrators want to enforce policies without requiring user intervention.
The following diagram shows an example where Alice connects via HTTP to example.net via a transparent proxy server. This proxy server is not configured on the client. No additional connection to the proxy is established. The network traffic is just routed trough the proxy where the packets are just forwarded:
In this case, the DNS lookup has to be performed on the client. because this is the only connection that is actively established.
TLS Inspection
A proxy can either simply inspect and forward requests as seen above or perform TLS inspection. TLS inspection means that the TLS traffic is decrypted so it can be analyzed more thoroughly. For this to work correctly, the client must have the proxy’s root certificate installed. Otherwise, the client will refuse to connect and get a TLS “unknown CA” error.
When a HTTPS connection through a TLS inspecting proxy in “normal” mode is established, the proxy forwards the TLS handshake to the target server ① and completes the TLS handshake ②. The proxy then finishes the TLS handshake with the client ③, but with an new generated certificate signed by the proxy’s CA. Since the TLS tunnel is established between the client and the proxy and another between the proxy and the server, the proxy can read all the transmitted data.
Side note: There are proxies that first fully complete the TLS handshake with the client by directly send a ServerHello back and only establish a connection to the target server after this TLS connection is successfully established. How this is implemented depends on the used proxy.
A transparent proxy is also able to inspect the TLS traffic. The proxy will also establish a separate TLS connection with the client and with the server, but just by replacing the necessary packets when they pass through. This allows the proxy again to inspect the TLS traffic:
What Is an SNI
Server Name Indication (SNI) is an extension to the TLS protocol defined in RFC 60662. This extension allows a client to tell the server the hostname it is trying to connect to in the ClientHello at the beginning of the TLS handshake. This is particularly useful for servers which host multiple websites on the same IP address, as it allows the server to provide the correct certificate to the client in the ServerHello message.
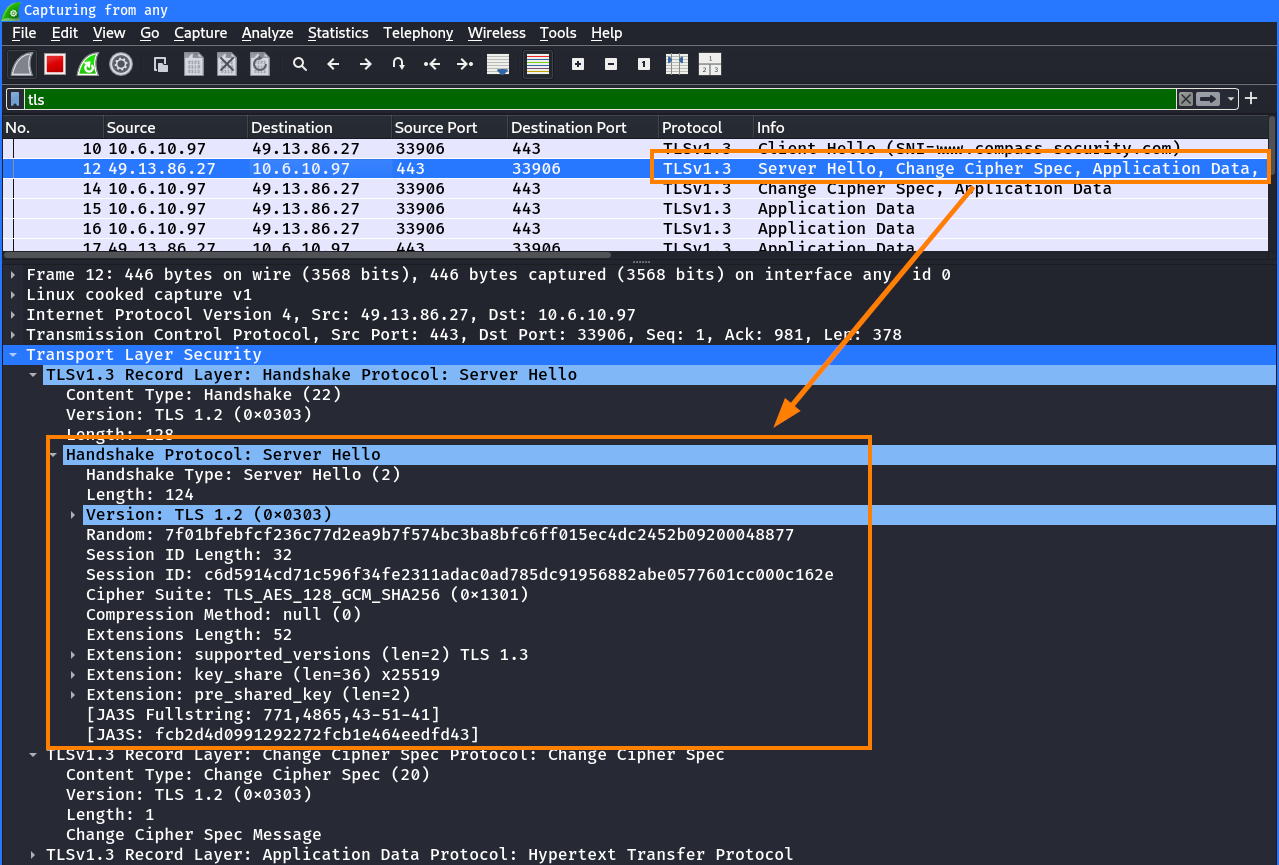
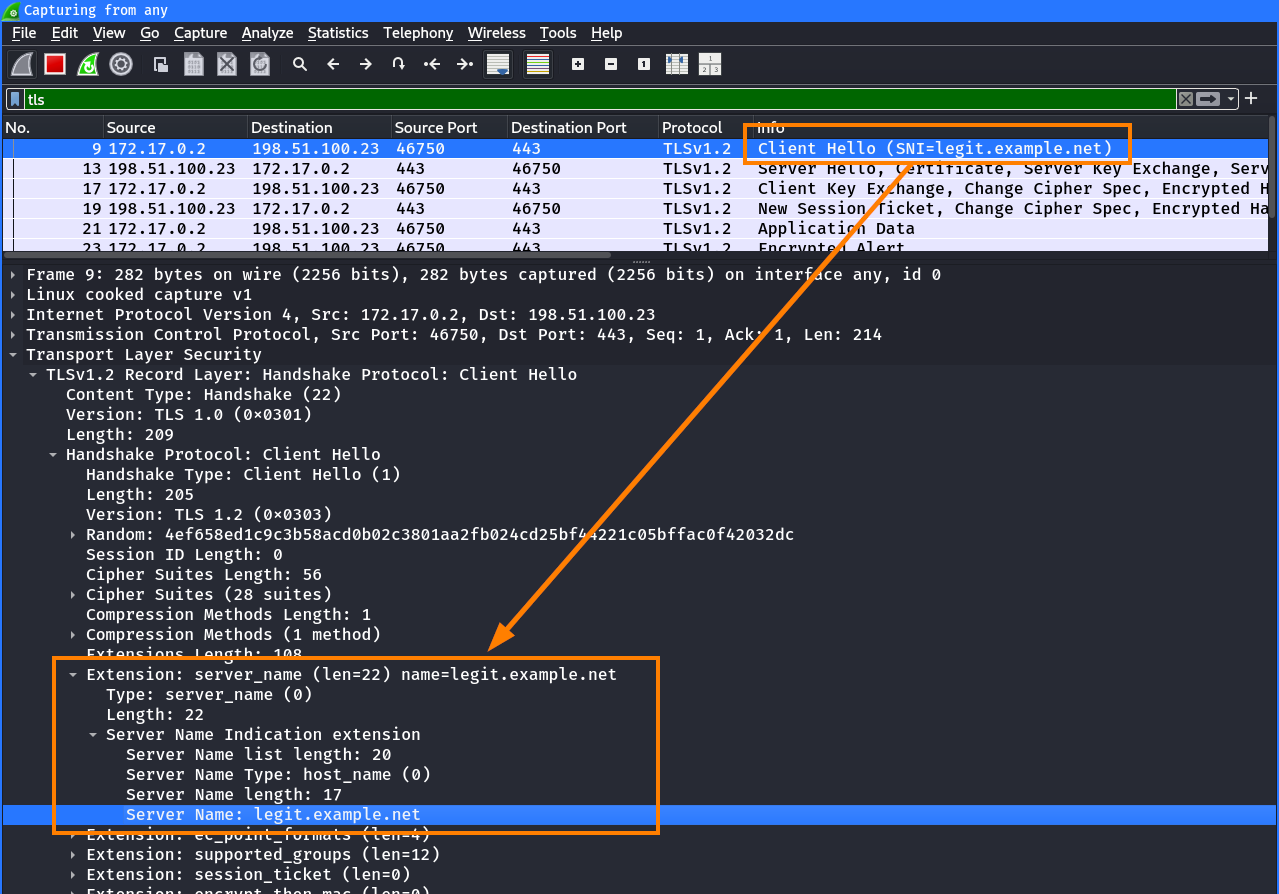
For example, if you access https://www.compass-security.com in your browser, the browser tells the webserver to connect to the host www.compass-security.com using the SNI extension in the ClientHello during the TLS handshake:
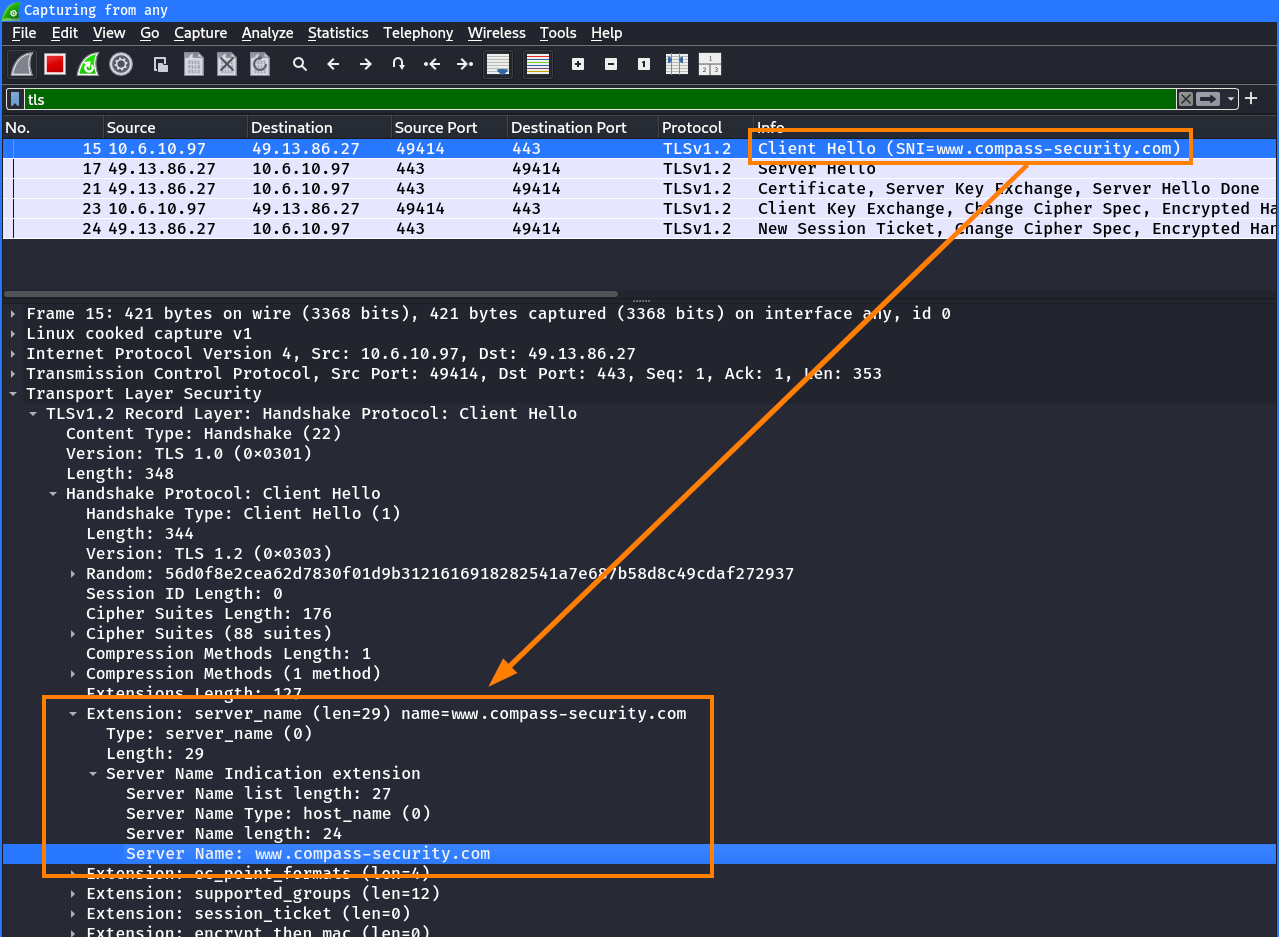
As a side note: The ClientHello in a TLS handshake is not encrypted in most versions of TLS, including TLS 1.3, unless specific extensions like Encrypted ClientHello (ECH)3 are used. Therefore, every system with access to the network traffic is able to see to which host a client connects, even if TLS is used.
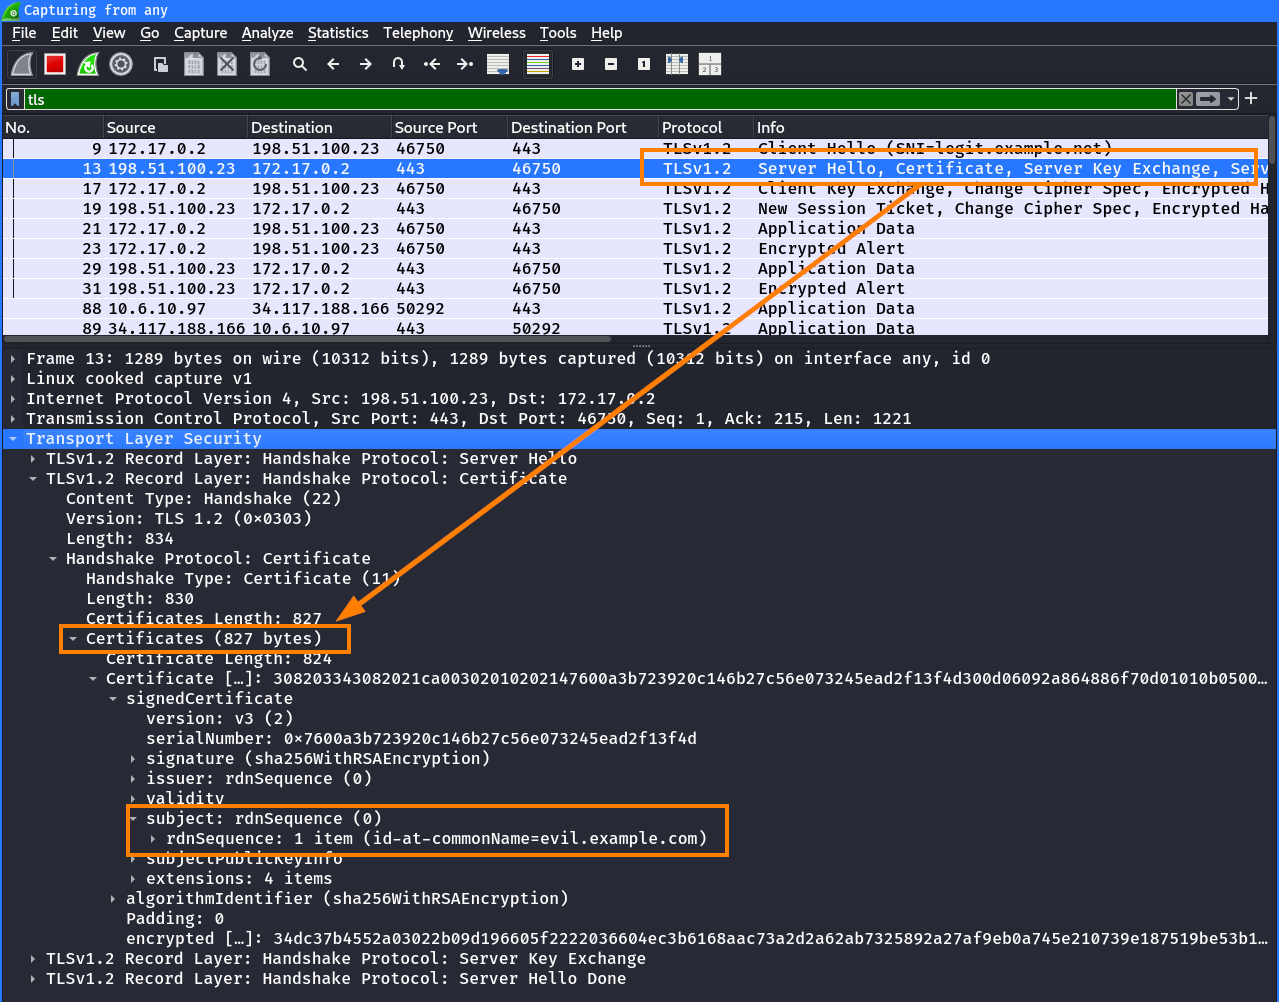
The webserver then knows that the certificate for www.compass-security.com should be used to proceed in the ServerHello during the TLS handshake:
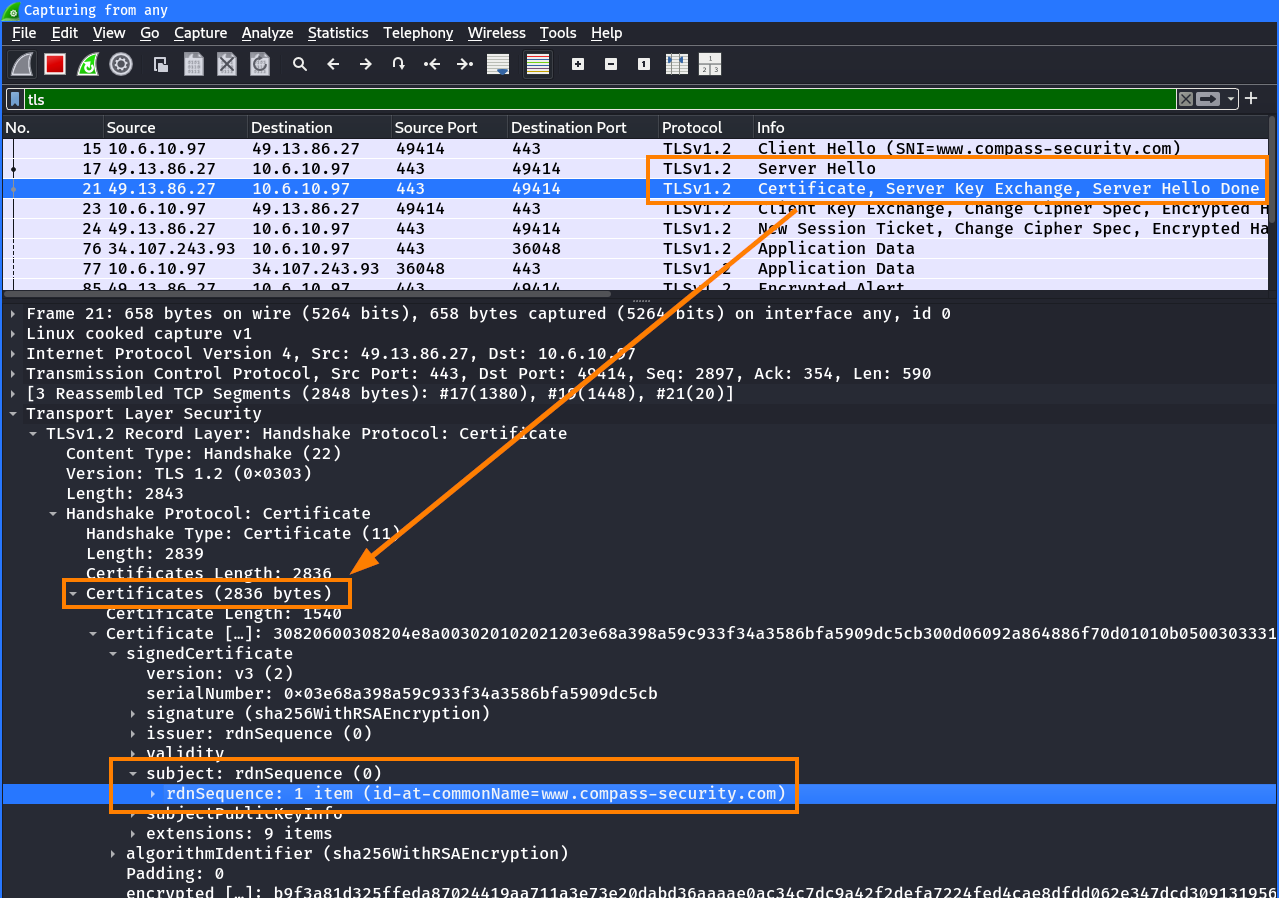
Whether the certificate is sent in cleartext depends on the used TLS version. In the screenshot above, TLS 1.2 was used where the certificate is always sent in cleartext to the client4.
In TLS 1.3, the certificate is not contained as cleartext in the ServerHello, but instead sent in an encrypted message to the client5:
SNI Based Web Filters
Now that we know what SNI is and how it works, let’s see what this has to do with web filters. Since the hostname in the SNI field in a TLS handshake is transmitted in cleartext, it provides an easy way for firewalls or proxies to identify and block traffic based on this hostname.
For example, this can be used to block users from accessing malicious websites or malware to communicate with their C2 server.
Bypassing Simple Web Filters Using SNI Spoofing
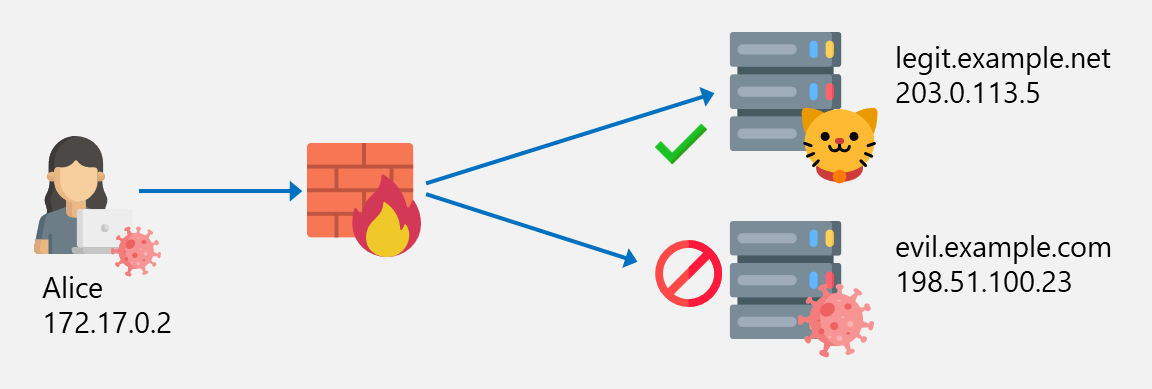
Imagine you have the following situation where Alice is able to access the website legit.example.net but access to evil.example.com is blocked by the firewall because of the SNI evil.example.com:
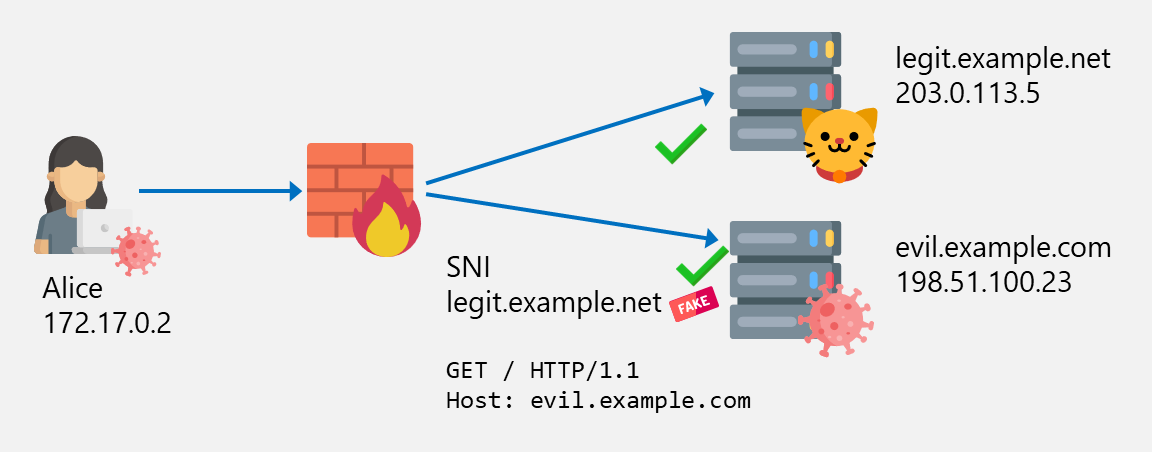
Alice (or a malware on her computer) is now able to bypass the web filter by connecting to the IP address of evil.example.com (198.51.100.23) but with the SNI legit.example.net:
This attack of requires control over the TLS request, which can be achieved by malware running on the system or by an attacker or user with system access attempting to bypass the web filter.
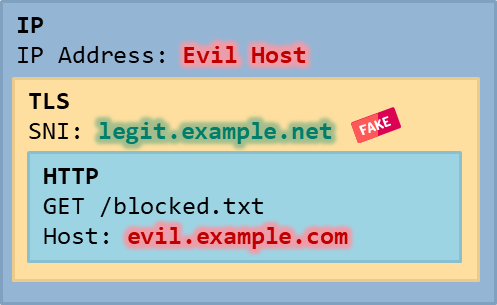
The final IP, TLS and HTTP packet structure looks like this:
This technique only works if the evil host is capable of handling TLS handshakes with an SNI of the legit hostname. If the evil host is under attacker’s control, this can easily be done and some webservers automatically accept arbitrary SNIs. However, if the evil host cannot be controlled, this system may not deliver the correct content for arbitrary SNIs.
Example Using OpenSSL
A TLS connection as shown above can be established using e.g. openssl6:
openssl s_client -connect 198.51.100.23:443 -servername legit.example.net- The
s_clientsubcommand ofopensslcan be used to establish TLS connections. - The
-connectoption is used to establish a TLS connection to the IP address ofevil.example.com. - The
-servernameoption is used to set the SNI tolegit.example.net.
So, this command establishes a TLS connection to the IP address of evil.example.com (198.51.100.23) with the SNI of legit.example.net. This can also be seen in the network traffic:
When TLS 1.2 is used (which can be enforced using the -tls_1_2 option in the openssl command), the certificate in the response shows that the TLS connection was established to the server with the certificate of evil.example.com:
Example Using curl
The same can be achieved using curl7:
curl -k --connect-to legit.example.net::198.51.100.23: -H "Host: evil.example.com" https://legit.example.net- The
-koption tells curl to ignore certificate warnings. The certificate would not be trusted, because the hostname does not match the subject / subject alternative names of the certificate. - The
--connect-tooption tells curl to connect to the provided IP address of theevil.example.com(198.51.100.23) host whenever the hostnamelegit.example.netis used. - The
-Hoption tells curl to set the HTTP Host request header toevil.example.com, so that the webserver knows which virtual host the client wants to access. Depending on how the webserver is configured, this could also be omitted to use the legit hostname .
This establishes a TLS connection to the IP address of evil.example.com (198.51.100.23) with the SNI server name of legit.example.net. The legit hostname from the target URL is automatically used by curl in the SNI:
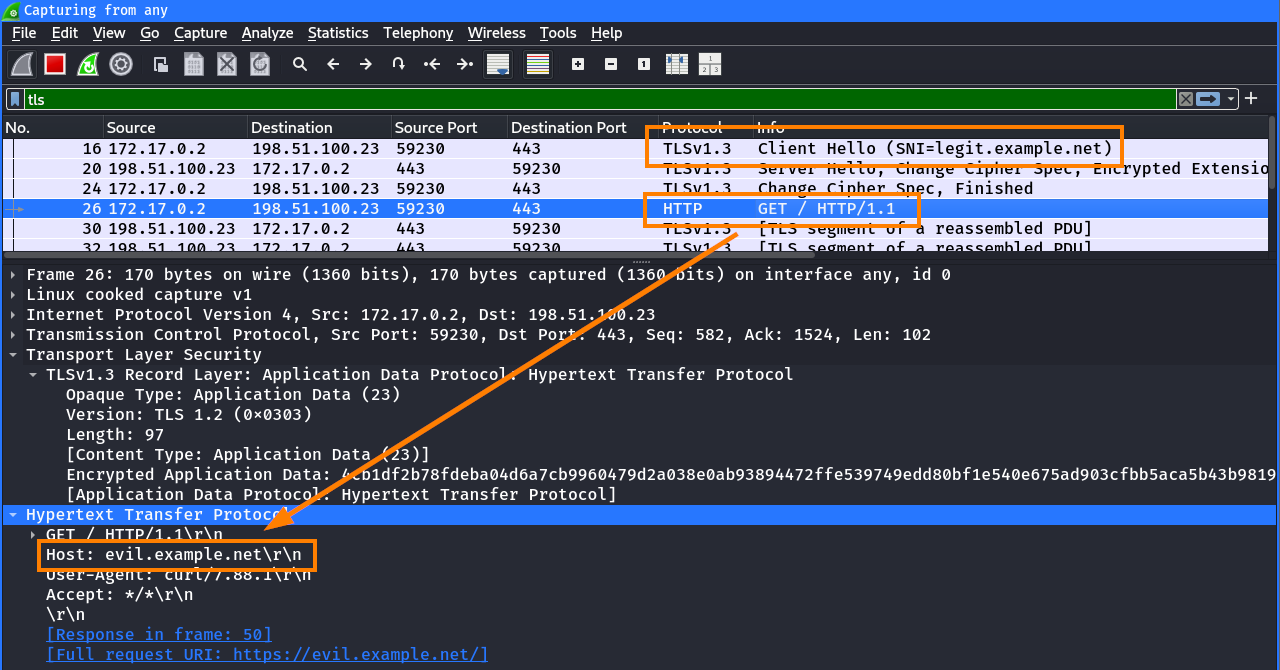
Note: The TLS traffic was decrypted in Wireshark just to show the HTTP Host header. A normal firewall / web filter which does not perform TLS inspection would not be able to see this information.
SNI Bypass on Explicit Proxy with TLS Inspection
In the curl command above, no explicit proxy was configured, which would typically be the case in a transparent proxy setup. First, I thought that SNI spoofing can only be done in transparent proxy setups, because in a setup where an explicit proxy is used, DNS resolution of the target hostname is done on the proxy and not on the client. How would a client be able to tell the proxy to establish a connection to another IP address when the DNS resolution is performed on the proxy?
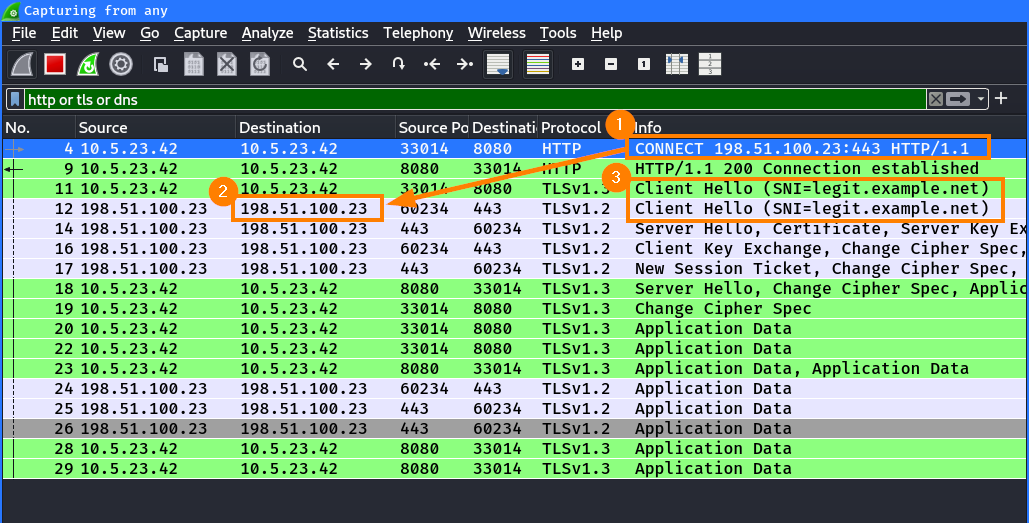
After some experiments, it turned out that my assumption was wrong and this can easily be done, even with a TLS inspection proxy. The client can just tell the proxy to establish a connection to an IP address in the CONNECT method. The client can then perform a TLS handshake with the proxy containing the spoofed SNI. The proxy will then establish a connection to the provided IP address and use the spoofed SNI. The --proxy option of curl can be used to specify a proxy:
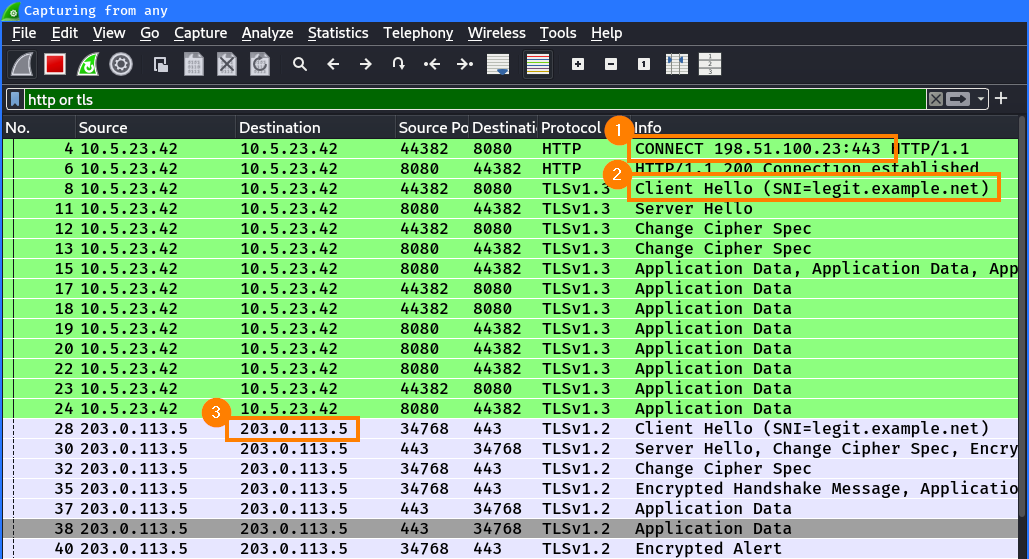
curl --proxy http://10.5.23.42:8080 -k --connect-to legit.example.net::198.51.100.23: -H "Host: evil.example.com" https://legit.example.netThe client will first establish a connection to the target IP address via the proxy using HTTP CONNECT ①. The proxy will then establish a connection to the provided IP address ② and send the spoofed SNI from the client ③. After this, the proxy will forward the data packets between the client and server:
However, there are proxies that do not respect the IP address from the CONNECT request ① and just resolve the hostname of the SNI ② and connect to this IP address ③:
This shows that not all proxy products work in the same way and bypasses highly depend on the used software or proxy configuration.
SNI Spoofing Protection and Limitations
It should be clear, that blocking/allowing TLS connections only by looking at the SNI is neither a very advanced, nor sound technique for web filters. I tried this bypass at several customers during penetration tests and client hardening / infrastructure reviews but was sadly never successful. If web filtering is implemented, more robust techniques are applied, like inspecting TLS traffic.
The web filter module of FortiGate from Fortinet for example, has the option to perform additional checks on the SNI:
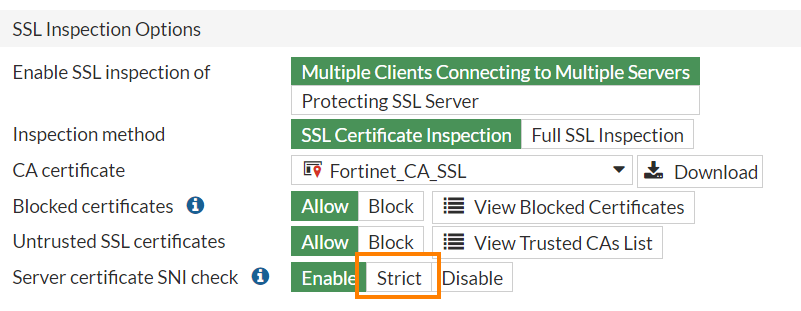
When the Server certificate SNI check option is set to Enable, FortiGate will use the server name from the certificate (either the subject or SAN) for checking whether a connection is allowed or blocked. Furthermore, if set to Strict8, the connection is directly terminated if the SNI and subject/SAN do not match.
This means to bypass such a web filter, you would also need to control the subject of the certificate in question, so it is properly aligned with the SNI you specified. Connecting to arbitrary blocked websites would therefore not be possible, because their certificate would not match the fake SNI . However, if you are also in control of the server, for example when running your C2 server, this can be done by installing a self-signed certificate issued to an allowed hostname. To prevent such attacks, a web filter should always correctly verify the certificate chain and terminate the connection for untrusted certificates.
Takeaway
In conclusion, SNI spoofing can be used to bypass some basic web filters but it’s not a technique that works against more sophisticated filter mechanisms when these are configured correctly.
In part 2 of this series, we will look into bypassing web filters via Host header spoofing.
References
- Tweet by @nullenc0de about bypassing SNI filters: https://twitter.com/nullenc0de/status/1159805999332638720 ↩︎
- RFC 6066, TLS Extension Definitions, Chapter 3, Server Name Indication: https://datatracker.ietf.org/doc/html/rfc6066#section-3 ↩︎
- Internet-Draft, TLS Encrypted Client Hello: https://www.ietf.org/archive/id/draft-ietf-tls-esni-22.html ↩︎
- RFC 5246, TLS 1.2, Certificate in Handshake: https://datatracker.ietf.org/doc/html/rfc5246#section-7.4.2 ↩︎
- RFC 8446, TLS 1.3, Encrypted Certificate in Handshake (diagram page 11): https://datatracker.ietf.org/doc/html/rfc8446#section-2 ↩︎
- OpenSSL manpage of
s_client: https://docs.openssl.org/master/man1/openssl-s_client/ ↩︎ curl(1)manpage: https://curl.se/docs/manpage.html ↩︎- FortiGate Administration Guide, Configuring an SSL/SSH inspection profile: https://docs.fortinet.com/document/fortigate/7.6.0/administration-guide/709167/configuring-an-ssl-ssh-inspection-profile ↩︎ ↩︎
Leave a Reply