In a previous blog post, we explored the technical side of passkeys (also known as discoverable credentials or resident keys), what they are, how they work, and why they’re a strong alternative to passwords. If you’re a curious techie, check that out first.
But today, we’re taking a more hands-on approach. We’ll show how passkeys are used in the real world – by everyday users and security professionals alike. First, let’s quickly revisit the basics.
Why passkeys are a better way to sign-in:
- They protect you from phishing.
- They’re extremely hard – essentially impossible – to guess.
- You do not have to memorize them.
- Each service (like a website or app) automatically gets its own unique passkey.
- Passkeys can’t be stolen in data breaches.
- They’re stored securely, either on your device or in the cloud.
There are two main types:
- Device-bound passkeys: Stored on a specific device like a security key or your phone.
- Synced passkeys: Stored in your credential manager of choice and shared across your devices (like with Apple iCloud Keychain or Google Password Manager).
Disclaimer: On Language and Precision
The terminology around passkeys is still evolving – and not always consistently used in the wild. While we strive to be accurate, we’ll occasionally trade formal precision for clarity. So, to all the RFC enthusiasts and standard purists out there: this post tries to walk the fine line between being correct and being readable. Please don’t shoot the messenger, I only mean well.
For those unfamiliar with the terminology of passkeys and authentication, there’s a glossary of key terms at the end of this post to help you out.
So… Are Passkeys Perfect?
After hearing about all these advantages, you might be thinking: “Okay, this sounds almost too good to be true. What’s the catch?”
And you’re right to ask. Passkeys are a big leap forward – but they aren’t magic. As with any security technology, they come with trade-offs. Let’s look at some of the realistic challenges you might face when adopting passkeys in your everyday life.
Synced Passkeys
One of the big promises of passkeys is improved usability. The FIDO Alliance – the group behind the standard – emphasizes that passkeys are not just more secure than passwords, but also easier to use. This is especially true when using Synced Passkeys, which are stored in your cloud-based credential manager and shared across your devices. Some widely known examples include:
- Apple’s iCloud Keychain
- Google’s Password Manager
- Third-party tools like 1Password, Keeper, or LastPass
Sounds great, right? It is – but it also comes with some caveats:
- If your credential manager is accessible on a shared device (say, a family iPad), everyone with access to that device might, in certain scenarios, be able to use your passkeys.
- Some platforms allow easy sharing of passkeys (e.g. on Apple via Airdrop). If a passkey is shared with another person, they receive unrestricted access to the corresponding service.
- Each credential manager handles passkeys slightly differently, which can affect how recovery, sharing, and syncing work in practice.
In other words, while synced passkeys improve convenience, they also bring some familiar challenges – particularly around managing device access and trust. It’s a classic case of balancing security and usability.
Device-Bound Passkeys
If you use a dedicated hardware device (hardware authenticator) to store your passkeys, they are referred to as device-bound passkeys. Examples for this could be a USB key, your smartphone or your laptop. These passkeys are not synced or backed up anywhere. This brings stronger control and isolation, but also the disadvantages are obvious:
- You must have the device with you to log in.
- The passkeys can no longer be synchronized between different devices
- If you lose your authenticator, all the passkeys stored on it are also lost. In extreme cases, this can lead to you being locked out of your account for good.
Device-bound passkeys are more secure in some ways, but less forgiving. If your only passkey lives on a lost or damaged authenticator, you might be in trouble.
Recovering Access
So, how do I regain access to my account after losing my device-bound passkey? Well, if this is the only authentication option you have configured, the answer is simple – in most cases, not at all. While some larger providers may offer limited account recovery options, relying on those is risky and not guaranteed. Therefore, it is paramount to configure a second, additional authentication option. I recommend the following setup:
- Primary login with a device-bound passkey
- Secondary backup login, consisting of:
- A strong and unique password stored securely in a password manager
- An additional second factor, such as an authenticator app on your mobile phone
The secondary backup login should only ever be used for recovery purposes. Additionally, those of you who want to be super safe can also have a second hardware authenticator stored in a secure location.
Stolen Authenticator: What Now?
But what if a stranger comes into possession of your hardware authenticator? Can they log in as you? Ideally, no. That’s where the so-called user verification feature comes into play. Before creating your first passkey on an authenticator, you can protect it with an additional layer of security. Depending on the model, this could mean:
- Entering a PIN.
- Scanning a fingerprint.
- Using Face ID.
If the service provider has implemented passkeys according to today’s standard and best practices, every use of a passkey must be verified by the user through one of these mechanisms. That means even if a thief steals your USB key or phone, they still can’t use your passkeys without passing the verification check.
As you might have noticed, some devices fall back to a PIN – which raises the questions: “Aren’t we now protecting our wonderful passkeys with one of those previously decried passwords again? Does this mean that we are reintroducing all the password-specific problems that we wanted to solve with passkeys in the first place?”
And as is the case with almost every closed question, the best answer to this one is: It depends. While it is true that with certain models, we must remember a PIN to use the passkeys, most current authenticators offer additional protection mechanisms to prevent unauthorized use such as:
- The hardware itself may include secure elements that resist tampering.
- Biometric authentication can be used which is tied to the user.
- The device may limit PIN attempts (brute-force protection).
- The device may enforce PIN complexity requirements.
This prevents the unauthorized use of our passkeys by the common thief, hacker or finder of a lost authenticator. Of course, there is the possibility that even these protection mechanisms can be circumvented by entities with extensive resources, but this is probably not a threat model that most users need to consider.
So Why Are We Talking About Passkeys Now?
Passkeys and the FIDO standard aren’t exactly new. The FIDO Alliance has existed for over a decade, and the concept of passkeys has been around since at least 2022. In fact, we’ve been dealing with this topic for years and performed several FIDO penetration tests. Additionally, we have:
- Given talks about it:
- Tested authenticators and firmware: https://www.token2.com/site/page/compass-security-schweiz-ag-completes-independent-public-security-review-of-token2-pin-fido2-security-keys
- Used FIDO Keys in penetration testing to backdoor Microsoft Entra ID Accounts: https://blog.compass-security.com/tag/device-code-phishing/
And we are by no means the only ones. Many well-known manufacturers, service providers and several other companies have reported on FIDO or passkeys in recent years. The consensus is clear: It’s great, use it! Unfortunately, adoption is only ramping up slowly. Not every service supports them yet. And not every user knows how to get started – that’s where this blog post comes in!
Ready to Try It?
Let’s take a practical look at how to use passkeys. In the next section, we’ll walk through a few step-by-step examples – how to set them up, where to try them, and what kind of authenticator you might want to acquire.
Protecting your Authenticator
In this example, we use:
- Device-bound Passkey: Token2 T2F2-PIN+ Release3 TypeC (out of the box)
- Windows 10
To securely use a device-bound passkey, the hardware authenticator must first be secured with an additional factor for user verification. This ensures you prove not only possession of the device but also ownership. User verification methods include PIN, fingerprint, face recognition, or password – depending on the authenticator.
While many authenticators offer dedicated software for this setup, using it overcomplicates things. A simpler, platform-independent approach is to use Windows built-in tools via Windows Sign-in options.
To do so:
- Plug in your authenticator
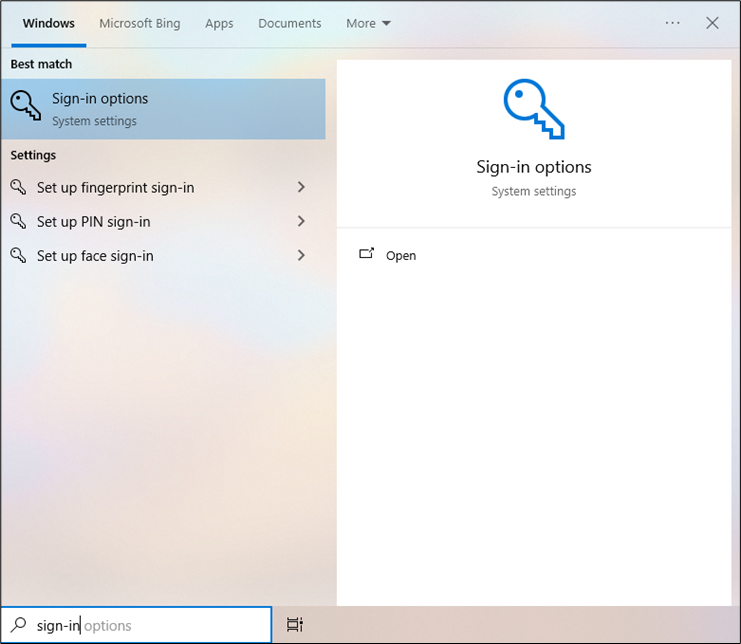
- Press the Windows key, type Sign-in, and select Sign-in options.
- Under Security Key, click Manage.

- Perform the user presence test by touching the sensor on your security key. This ensures that the correct authenticator is configured.
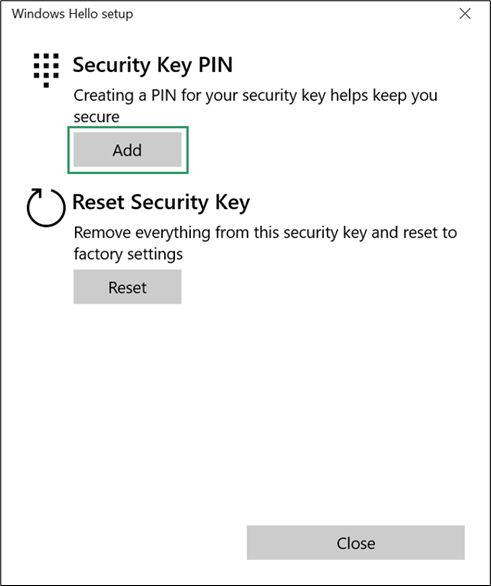
- Click Add under Security Key PIN.
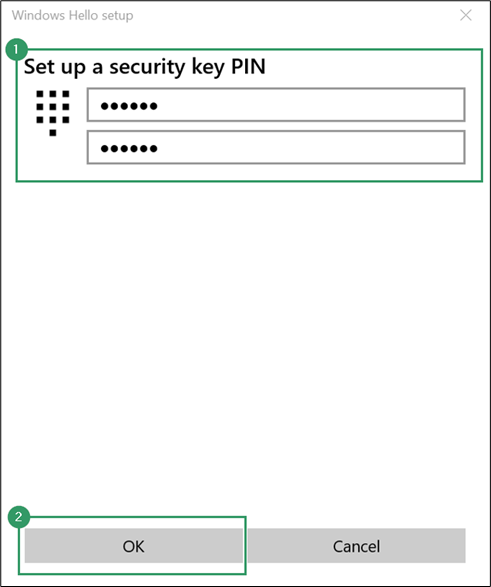
- Enter and confirm your desired PIN. Avoid patterns (e.g. 123456), anything related to personal information (like your birthdate), and don’t reuse a PIN you’ve used elsewhere.
Your authenticator is now secured with a PIN and ready for passkey use. That was straightforward – so, let’s use passkeys!
The next example will show how to use this authenticator to secure an existing Migros account with a passkey.
Adding a Passkey to an Existing Migros Account
In this example we use:
- Device-bound Passkey: Token2 T2F2-PIN+ Release3 TypeC (secured with PIN)
- Windows 10
- Google Chrome Browser
- Migros Website https://migros.ch/
To register a passkey with your existing Migros account, follow these steps:
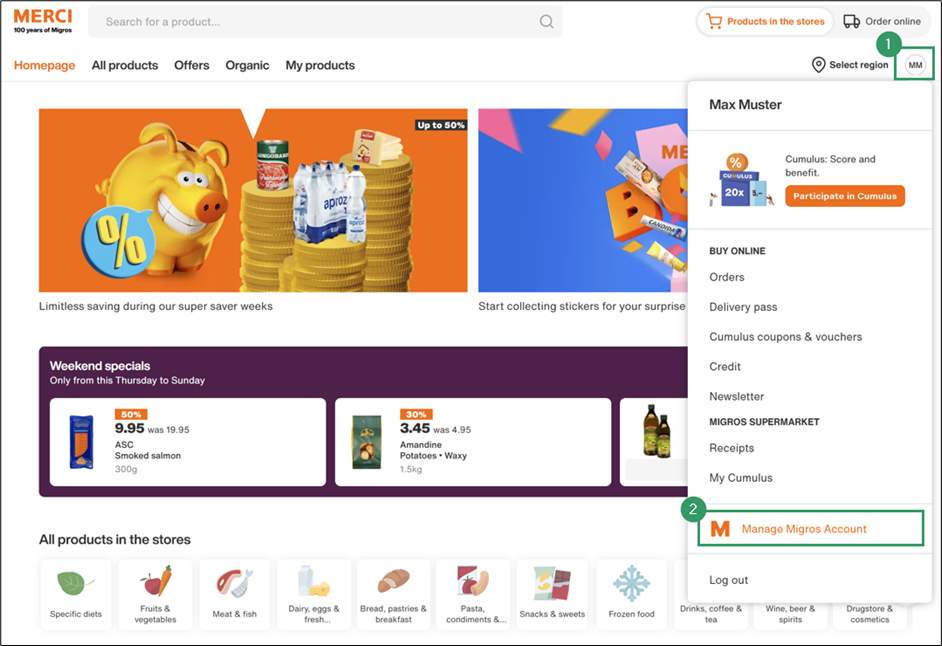
- Log in and click your account icon in the upper right corner.
- Select Manage Migros Account.
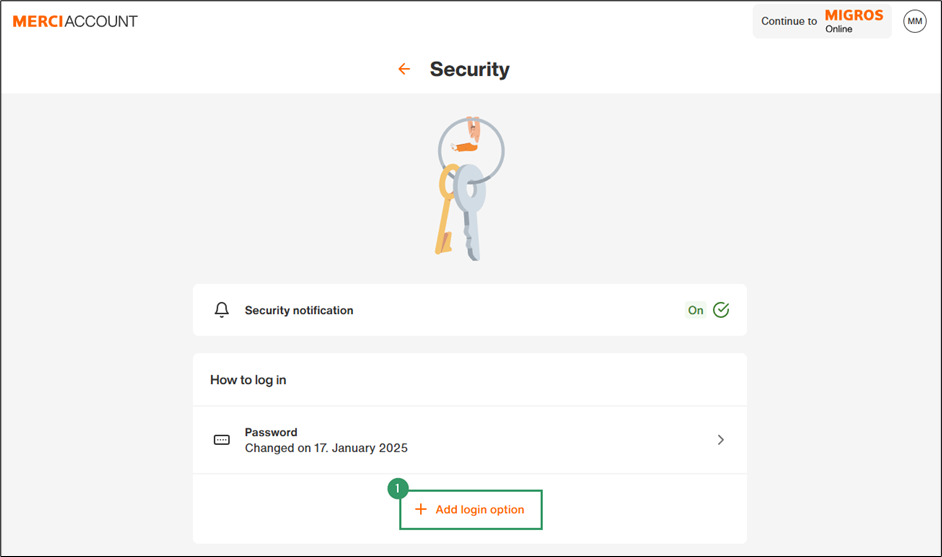
- Navigate to Profile > Security.
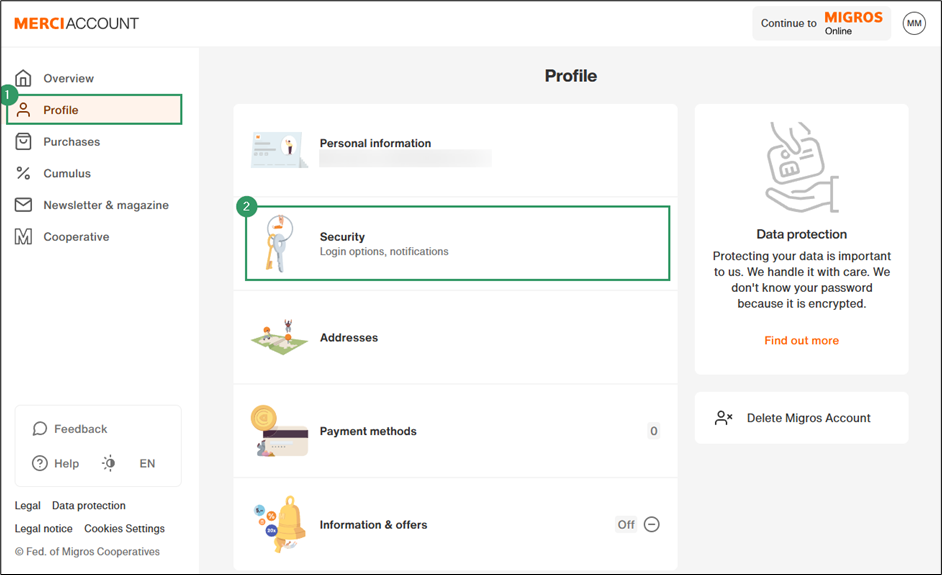
- Click Add login option
- Select You can login with passkeys without the need for a password.
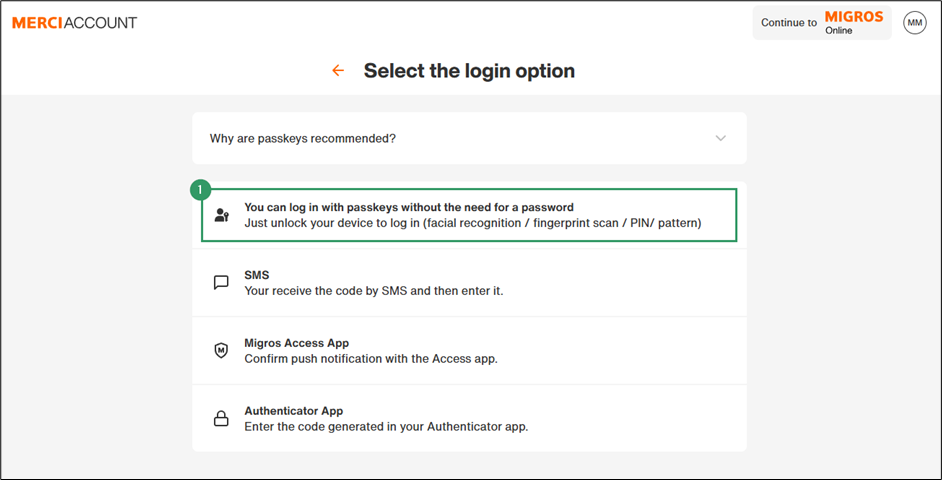
- Select Add passkey

- Click Understood, continue.
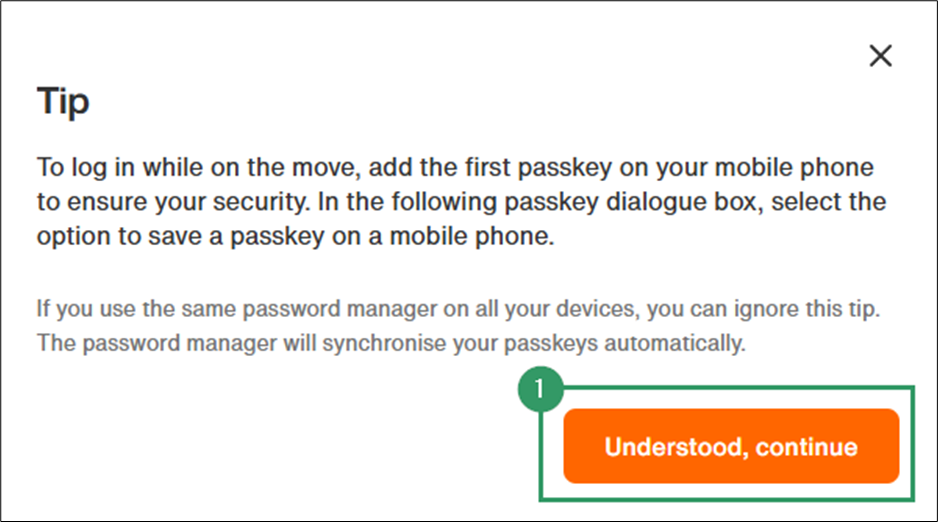
Your browser will now begin negotiating with available authenticators to determine where to create the passkey. This is handled by the client platform (in this case, Chrome), which presents each available authenticator in sequence:
- Your browser’s password manager (for synced passkeys)
- Windows Hello (Hardware / Platform Authenticator)
- Your external hardware authenticator (the Token2 hardware key we want to use)
To ensure the passkey is created on your hardware authenticator, you’ll need to reject the other options. – but don’t worry and don’t be shy. Just be brave and click close. Even if we reject one request too many, we can simply go back to the previous step and start adding a passkey again.
- Decline creation via the browser’s password manager.
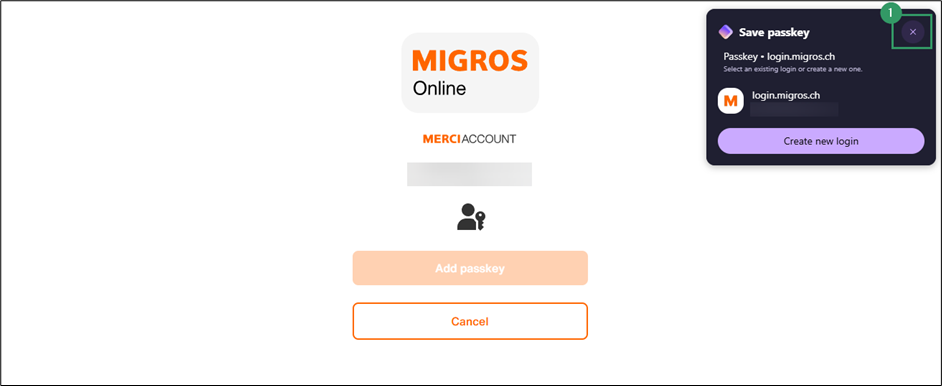
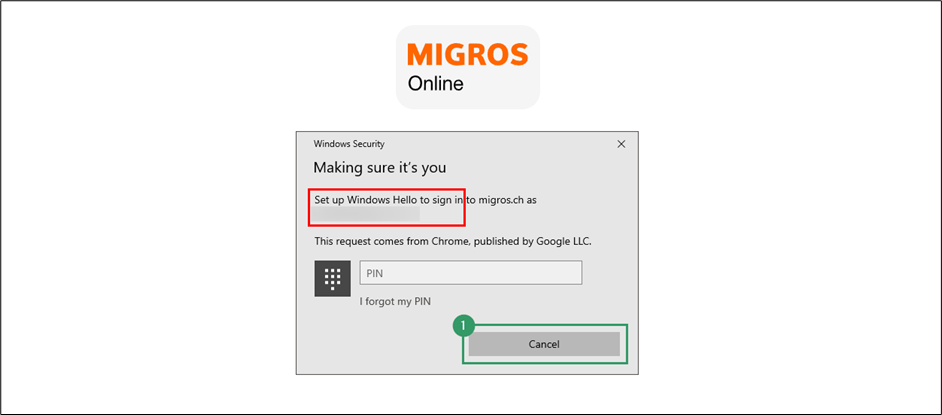
- Decline creation via Windows Hello.
- Accept creation on the Token2 authenticator.
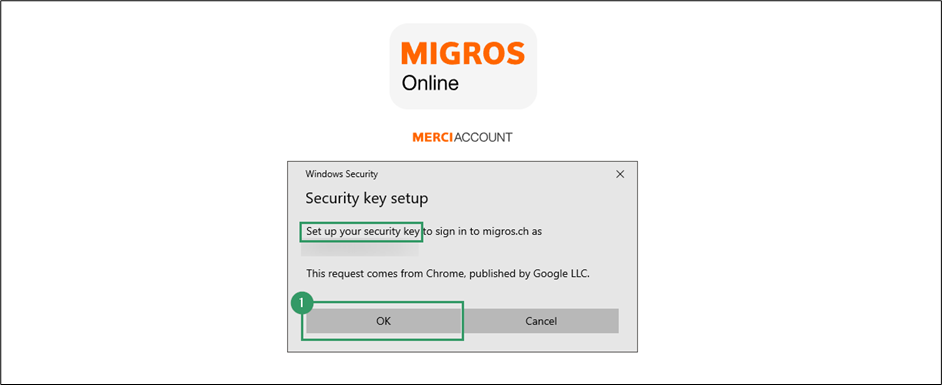
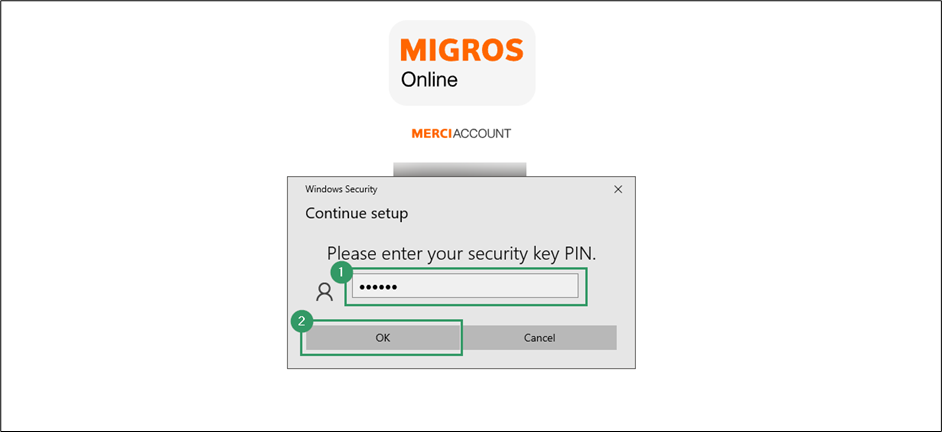
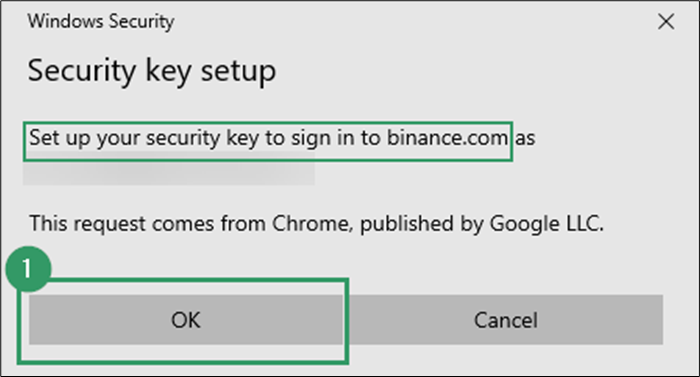
- Confirm the Windows Security prompt.
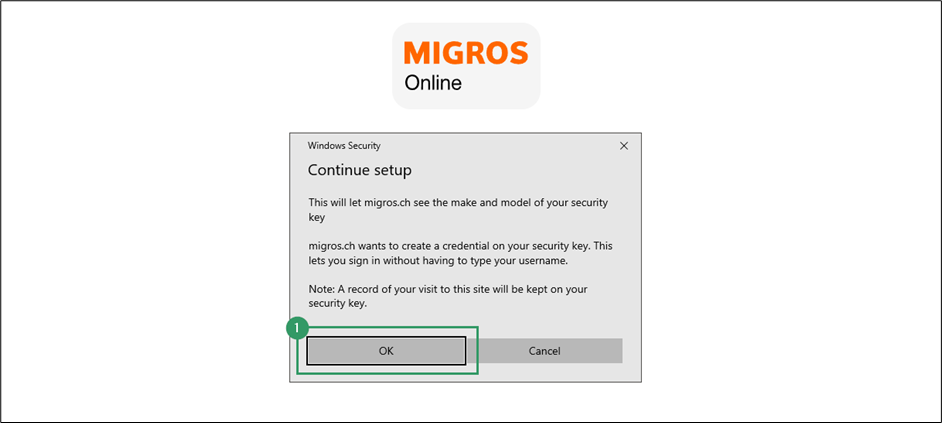
You might have noticed the remark about Migros being able to see the make and model of your authenticator. Does that mean that your privacy is at risk here?
Fear not, this has been thought of by the FIDO alliance as well. The website will simply be able to see what kind of authenticator you are using (i.e. the Token2 hardware security key), and what capabilities this authenticator has (e.g. supported authentication options). However, no unique identifier or information related to your person will be shared.
- Enter the PIN set in the previous chapter for user verification
- Complete the User Presence Test by touching the authenticator.
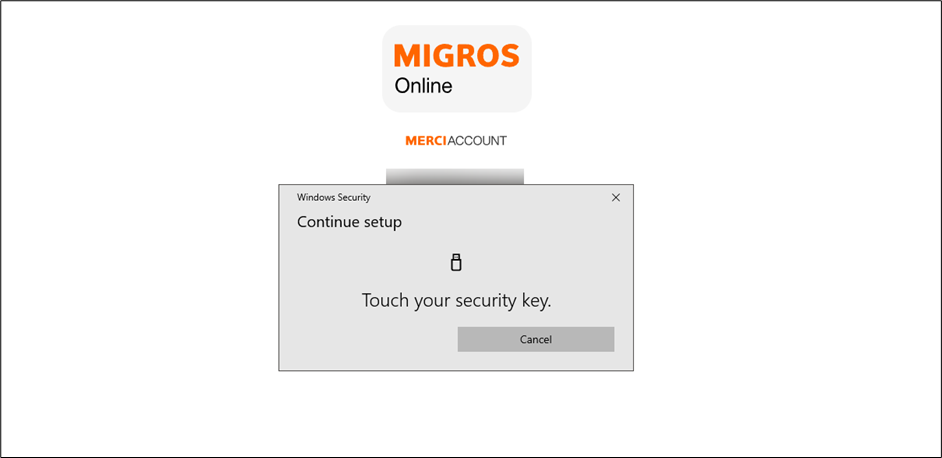
Et voila, a new passkey has been successfully created on your hardware authenticator.
To use it for login:
- Log out first
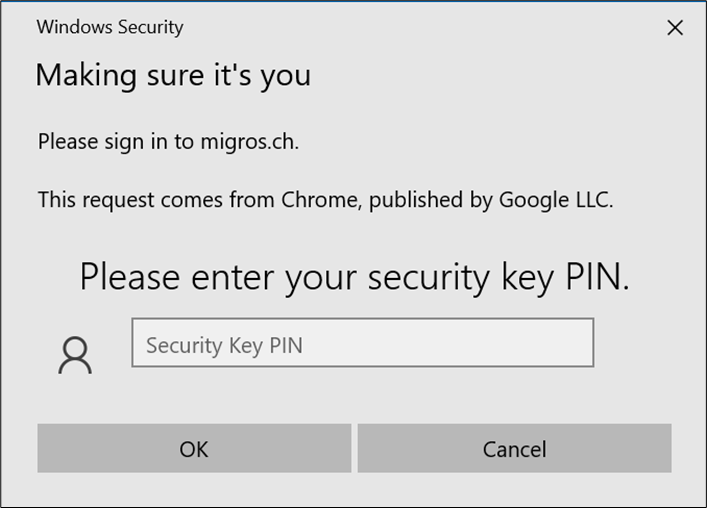
- Navigate to the Migros login page and enter your email address.
- Select Windows Hello or external security key.

- Enter your PIN to unlock the key.
- Complete the User Presence Test (touch the sensor).
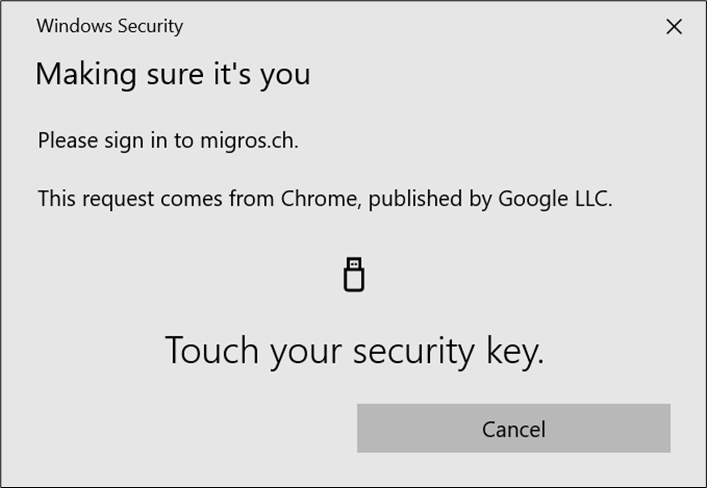
You are now securely logged in with your passkey—great success!
Before wrapping up, make sure to keep a backup authentication method available for account recovery. This could be:
- A username and password stored in a password manager
- A second factor, such as a mobile authenticator app
Ideally, set up this recovery method before registering a passkey.
That was actually quite simple—so, let’s use passkeys!
Adding a Passkey to a Binance Account
In this example we use:
- Device-bound Passkey YubiKey 5 Series with NFC (secured with PIN)
- Windows10
- Google Chrome Browser
- Binance Website https://www.binance.com/
In this example, we assume that the used authenticator is already secured with a PIN, so we can skip the steps from the previous “Protecting your Authenticator” section. Let’s move on and protect an existing Binance account with a device-bound passkey.
- Log in to your Binance account using your existing method (username + password + 2FA) and make sure your credentials are securely stored for future account recovery.
- Go to Account > Security > Enable Passkeys.
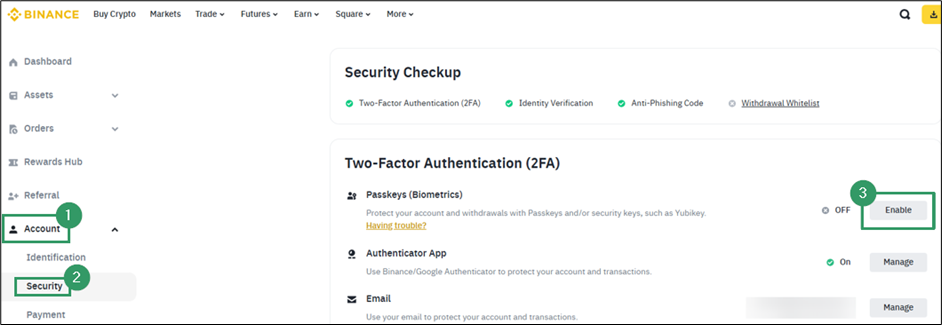
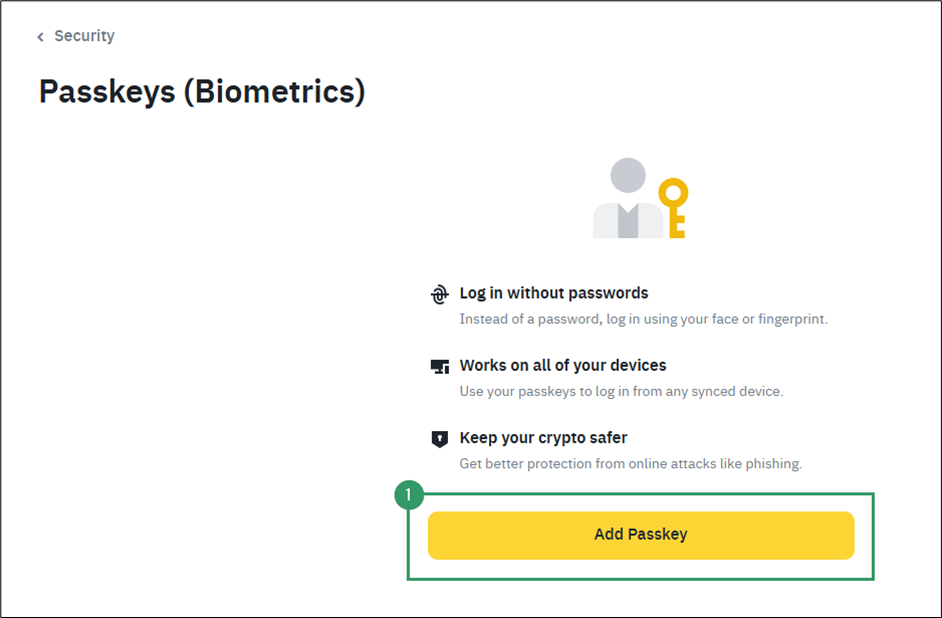
- Click Add Passkey.
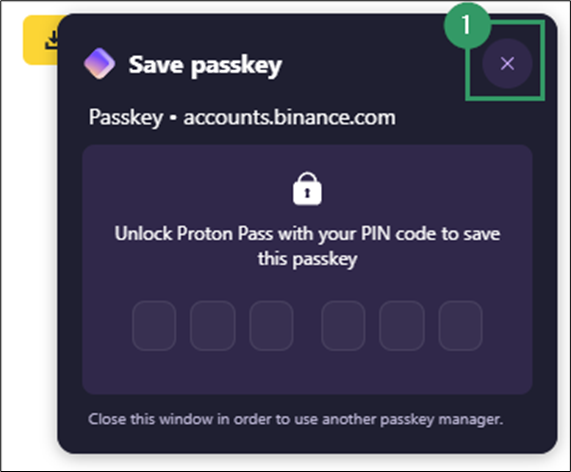
The browser will begin the passkey registration process by offering all available authenticators in sequence. As before, you must reject the ones you don’t want to use.
- Decline creation via the browser’s password manager (for synced passkeys).
- Decline creation via Windows Hello (platform authenticator).
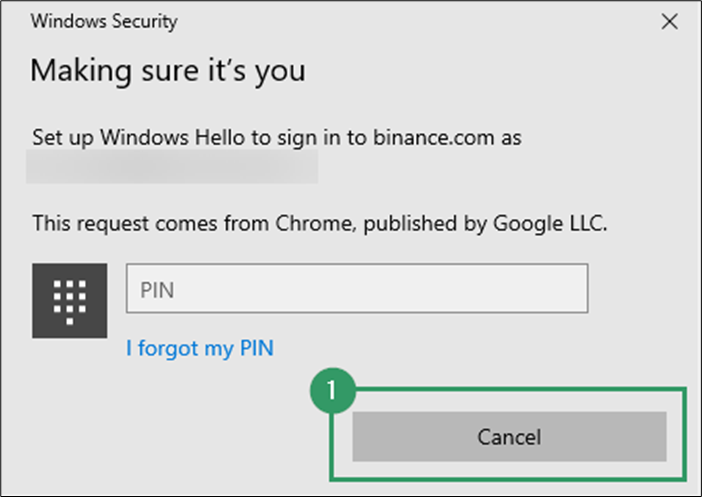
- Accept creation on the YubiKey (your hardware authenticator).
- Complete user verification by entering the PIN, followed by the User Presence Test (touch the sensor).
The passkey is now stored securely on your hardware authenticator and ready to use for login.
Now that you’ve seen two examples, you can see: the steps for setting up a passkey vary only slightly. Once you’ve crossed that initial hurdle, it’s easy to use and adds a major layer of security – so, let’s use passkeys!
Using a Synced Passkey with Google Password Manager
In this scenario, we want to create a synced passkey for an Amazon account, using Google Password Manager to allow flexible, cross-device login—ideal for users with Android devices who prefer not to install third-party password managers.
We use:
- Windows 10
- Google Chrome Browser
- Google Pixel 8
- Google Account
- Amazon Website https://www.amazon.com/
On the Windows 10 Laptop:
- Sign in to Google Chrome with your Google account.
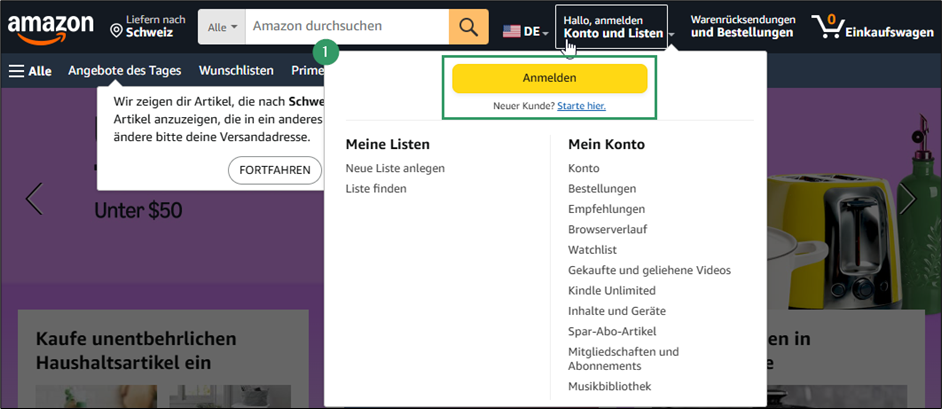
- Visit www.amazon.com, then click Starte hier next to Neuer Kunde.
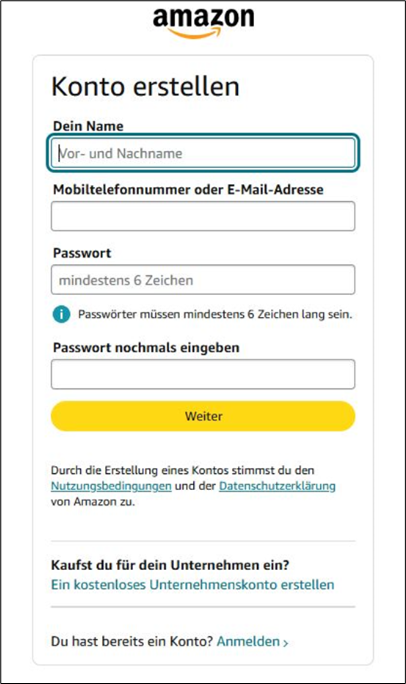
- Complete the registration form and choose a strong password (used for account recovery).
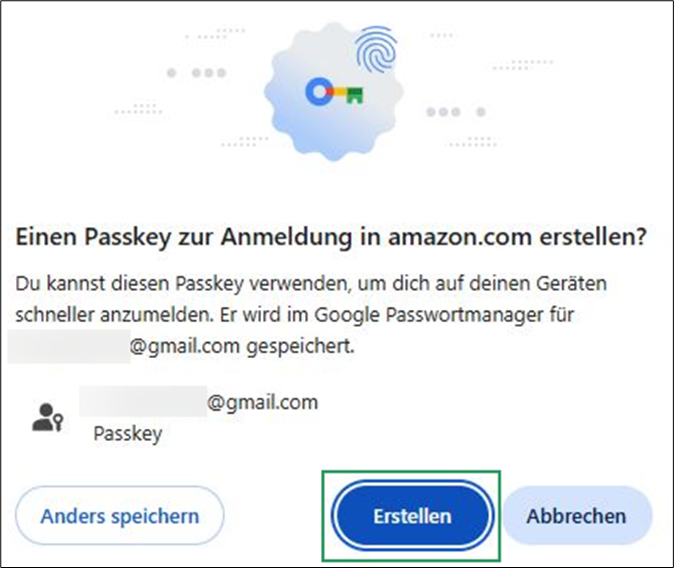
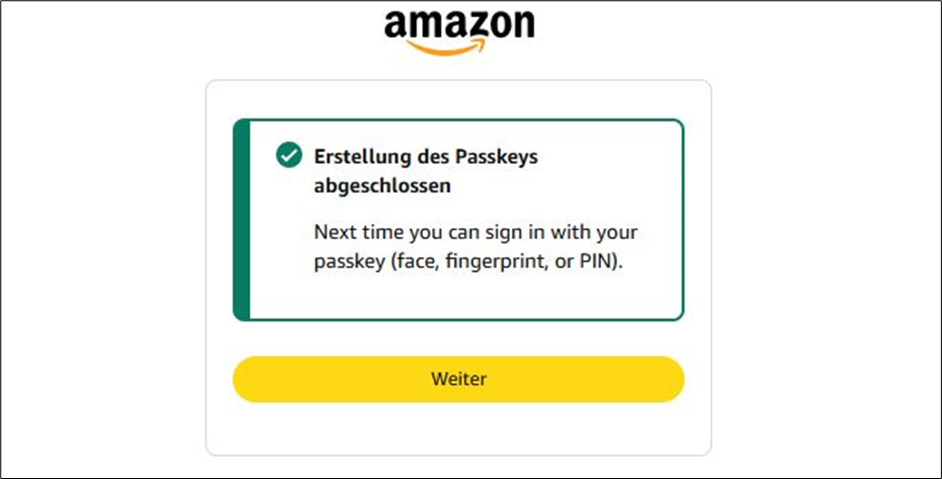
- If you’re logged in and your browser supports passkeys, you will see a prompt to create one. Click Erstellen:
- If your Google Password Manager isn’t protected yet, you’ll now be prompted to set a PIN. Please remember the previously discussed points about choosing a secure PIN!

- Et voila, You’ve created an Amazon account secured by both a synced passkey and a password.
Now, on the Google Pixel 8:
- Make sure you’re signed into Google Chrome with the same Google account.
- Go to amazon.com and click the E-Mail-Adresse oder Telefonnummer input field. In the menu bar, above your keyboard, you’ll see the synced passkey offered by Google Password Manager.
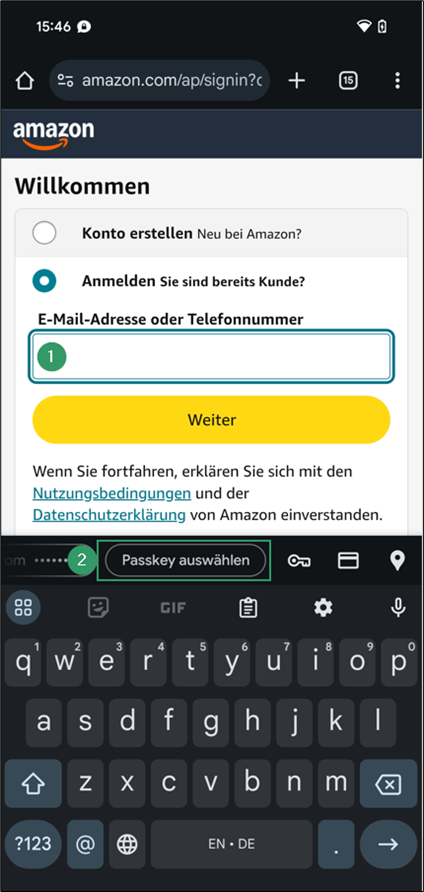
- To unlock the passkey, first pass the screen lock (e.g. fingerprint or pattern), then enter the PIN you set previously.
That’s it! You’ve just signed in with phishing-resistant authentication across multiple devices to a platform frequently targeted by attackers. Well done – let’s use passkeys!
Using a Hardware Authenticator with a Mobile Device
Hardware authenticators offer great interoperability. Thanks to USB-C and NFC, you can easily use them with mobile devices. In this example, we use a device-bound passkey on a hardware token to log in to GitHub via a Google Pixel 8 phone.
- Google Pixel 8
- Device-bound Passkey: Token2 T2F2-PIN+ Release3 TypeC (protected with PIN)
To do so:
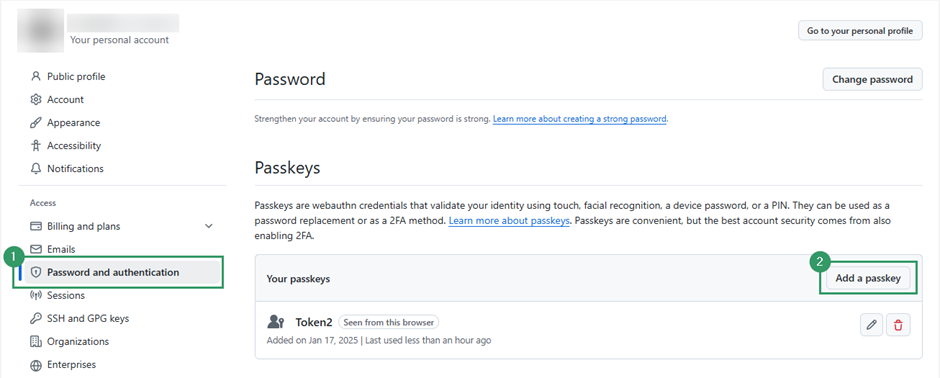
- First, add a passkey to your GitHub account on a desktop or laptop. This process is like the previous examples. Log into your GitHub account, go to https://github.com/settings/security, click Add a passkey, and follow the prompts to register your hardware authenticator (remember to skip other offered options such as Windows Hello).
As soon as a corresponding passkey is saved on our hardware authenticator, we can also use it with our mobile phone.
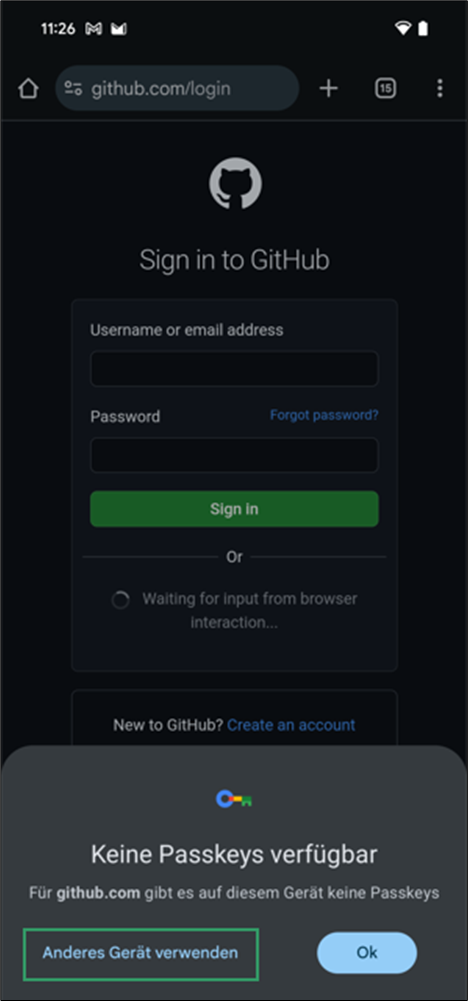
- On your mobile phone, open the browser and go to github.com/login. Click Sign in with a passkey.
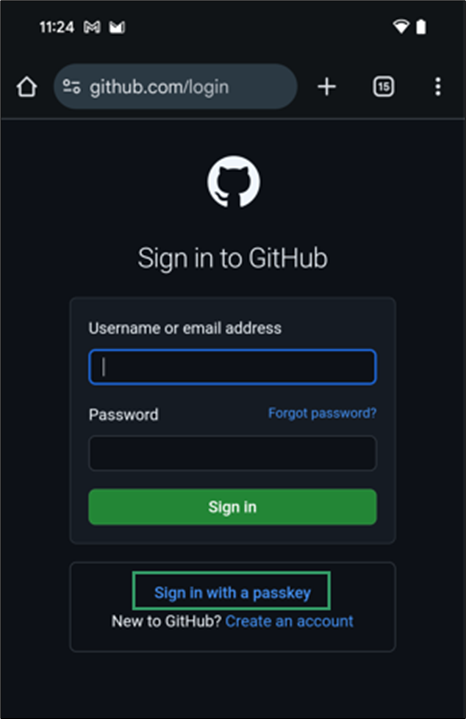
- Since you’re logged into Google but don’t have a passkey stored in Google Password Manager, you’ll see a message prompting you to Anderes Gerät verwenden. Tap it.
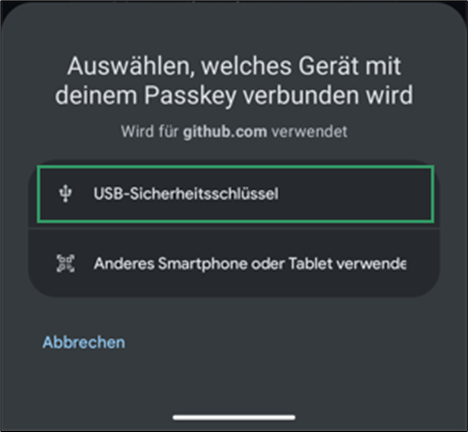
- In the pop-up, select USB-Sicherheitsschlüssel to use your hardware authenticator.
- You will be prompted to plug in your USB-C hardware authenticator.
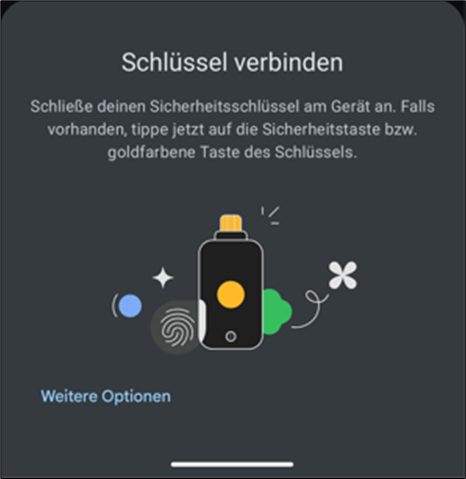
- When you connect the authenticator, it will be recognized automatically. A prompt appears asking you to unlock it with your PIN.
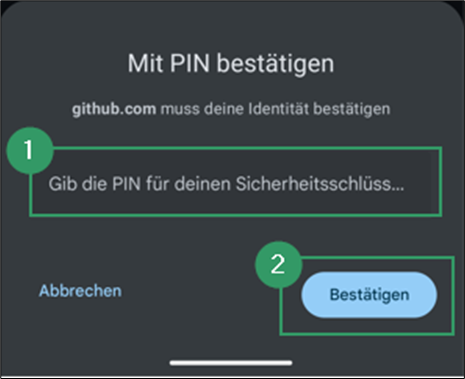
- After unlocking, complete the User Presence Test by touching the authenticator’s sensor.

Et voila, you’ve securely logged into GitHub using your hardware authenticator on your phone. As simple as that — let’s use passkeys!
Setting Up Passkey Authentication for SSH
Did you know? Passkeys can also be used for other services, not just websites. Let’s use a passkey to secure the SSH login on our own servers!
In the following example we use:
- Device-bound Passkey: Token2 T2F2-PIN+ Release3 TypeC (protected with PIN)
- GNU/Linux running Kali Linux 2024.4
- OpenSSH_9.9p1 Debian-3, OpenSSL 3.4.0 22 Oct 2024
Requirements
To use the Token2 for SSH, you must ensure that your SSH client is version 8.2 or higher, (see: https://www.openssh.com/txt/release-8.2). You can verify your version with ssh -V.
In addition, the corresponding algorithms must be supported on the client and server:
For OpenSSH 9:
ssh -Q PubkeyAcceptedAlgorithms | egrep '^(sk-ssh-ed25519|sk-ecdsa)'For OpenSSH 8:
ssh -Q PubkeyAcceptedKeyTypes | egrep '^(sk-ssh-ed25519|sk-ecdsa)'Generate the Key
If all prerequisites are met, you can generate a FIDO2 Resident Key (Discoverable Credential) which is stored on the Token2 and protected with PIN and touch:
ssh-keygen -t ed25519-sk -O resident -O verify-required -O application=ssh:<description> -C <comment>Note the following things:
- The application string must start with
ssh:to be recognized by OpenSSH. - OpenSSH uses the
nulluser by default; override with-O user=<user>if needed. - Touch is required by default; to disable, add
-O no-touch-required. - Server-side config can enforce PIN/touch via
PubkeyAuthOptionsliketouch-requiredorverify-required.
Use the Key
As all the information for a resident key is stored on the token, you can then also use the key on other systems. You can either:
- load the key temporarily into the ssh-agent:
ssh-add -K - export key handles and public keys for reuse:
ssh-keygen -K
Note: The private key file is a key handle and not usable without the hardware authenticator.
Example Workflow
Subsequently the complete flow is shown in a real-world example.
- Check prerequisites and confirm algorithm support.
analyst@abacus
~/ ssh -V
OpenSSH_9.9p1 Debian-3, OpenSSL 3.4.0 22 Oct 2024

analyst@abacus
~/ ssh -Q PubkeyAcceptedAlgorithms | egrep '^(sk-ssh-ed25519|sk-ecdsa)'
[email protected]
[email protected]
[email protected]
[email protected]
- Generate the FIDO2 resident key with the authenticator plugged-in; when prompted, specify file locations.
analyst@abacus
~/ ssh-keygen -t ed25519-sk -O resident -O verify-required -O application=ssh:example-ssh-server -C 'example ssh server resident key' -O user=analyst

Generating public/private ed25519-sk key pair.
You may need to touch your authenticator to authorize key generation.
Enter PIN for authenticator:
You may need to touch your authenticator again to authorize key generation.
Enter file in which to save the key (/home/analyst/.ssh/id_ed25519_sk):
Enter passphrase for "/home/analyst/.ssh/id_ed25519_sk" (empty for no passphrase):
Enter same passphrase again:
Your identification has been saved in /home/analyst/.ssh/id_ed25519_sk
Your public key has been saved in /home/analyst/.ssh/id_ed25519_sk.pub

analyst@abacus
~/ ll /home/analyst/.ssh
total 32K
drwx------  2 analyst analyst 4.0K Feb 13 18:12 .
drwx------ 38 analyst analyst 4.0K Feb 14 09:20 ..
-rw-------  1 analyst analyst  488 Feb 14 10:04 id_ed25519_sk
-rw-rw-r-- 1 analyst analyst 184 Feb 14 10:04 id_ed25519_sk.pub- The public key
id_ed25519_sk.pubcan then be added to the server’sauthorized_keysfile. - Authenticate to your SSH server using your passkey, requiring user verification and user presence checks to be performed.
analyst@abacus
~/ ssh 192.168.178.48
Confirm user presence for key ED25519-SK SHA256:Dl6Kp/v4EmgABSbpjYMhBGht/sxucuD6qdLuXcy604s
Enter PIN for ED25519-SK key /home/analyst/.ssh/id_ed25519_sk:
Confirm user presence for key ED25519-SK SHA256:Dl6Kp/v4EmgABSbpjYMhBGht/sxucuD6qdLuXcy604s
User presence confirmed
Linux ssh-server 6.11.2-amd64 #1 SMP PREEMPT_DYNAMIC Kali 6.11.2-1kali1 (2024-10-15) x86_64


                      .0.
<8a8a8zzzzzzzzzzzzzzo0   0
 7 7 7                '0'
 7 7 7

Great Success - Let's use Passkeys!


Last login: Fri Jun 13 13:37:16 2025 from 192.168.178.187
analyst@ssh-server
~/ hostname
ssh-server
Setting up passkeys for SSH might sound technical, but once configured, it adds a powerful, phishing-resistant layer of security – so, let’s use passkeys!
Additional Resources
For those who want to dive deeper or explore practical use cases, here are some helpful resources:
- Extensive list of passkey-supported applications: https://passkeys.directory/
- Helpful integration guides: https://www.token2.com/site/page/integration-guides
- Useful information for developers: https://developers.yubico.com/Passkeys/
Getting Yourself a Token
Now that we have seen several examples of how to use passkeys, you are no doubt eager to secure your accounts with them. My personal preference is to use a hardware authenticator, so here is a little tip to help you choose a suitable authenticator.
The FIDO Alliance rates authenticators from L1 (basic) to L3+ (most secure). We currently recommend:
- Look for FIDO Certified Level 2 (L2) or higher (I am not aware of any consumer-grade L3 or L3+ certified authenticators at this time).
- Use this directory to choose an authenticator: https://tools.token2.com/fido2/info/mds.php
- Or check the official FIDO metadata (for experts): https://fidoalliance.org/metadata/
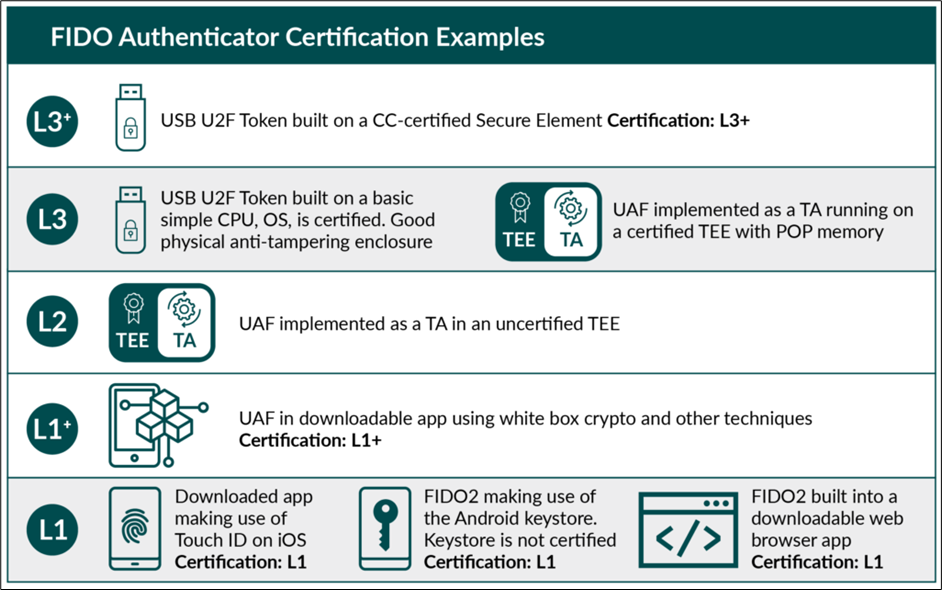
Source: https://fidoalliance.org/certification/authenticator-certification-levels/
Final Thoughts
Switching from passwords to passkeys takes a bit of effort. It’s unfamiliar, it might seem weird, and yes – there’s a learning curve. I know that exploring unknown territory can be scary and learning is uncomfortable at best for most of us. But it’s worth the effort!
Unfortunately, it is a fact that every day, thousands of our fellow human beings are tricked by phishing emails, spoofed sites, and social engineering attacks – and in the process, are cheated out of their belongings. The cause: far too often, passwords.
You may think: “It won’t happen to me.” But what about your parents? Your kids? Your less tech-savvy coworkers?
Passkeys are your chance to break the phishing cycle – for good. So, let’s do it together! Therefore:
- Builders, build!
- Implementers, implement!
- Users, use!
And to all the scammers and phishers out there: Better start looking for a meaningful job!
As with any authentication mechanism, the security guarantees of passkeys also rely heavily on the correct implementation of the corresponding standards. For example, in two-factor authentication, developers must ensure that the second factor cannot be bypassed; similarly, with passkeys, user verification must always be enforced.
As an end user, you do give up a bit of control and place trust in the service provider to handle things correctly. While you can’t see everything happening under the hood, you can check for certain signs – like whether user verification (e.g. PIN or biometric) is enforced during login. That’s already a good indicator that the developers adhere to the required standards.
If you’re a developer and want a second opinion on your passkey integration, just give us a call. We’re always happy to help. Let’s use passkeys together – to build a safer digital world.
In this article, we only covered a few services that support passkeys. Do you use others, or do you know an L3 Authenticator? What is your experience with passkeys, and do you have any useful tips to share? Let us know in the comments!
Passkey Starter Checklist
Personally, I do like check lists – especially when dealing with something new. Therefore, you also get one:
Prepare Your Devices and Accounts
- Make sure your devices, operating systems and browsers are up to date.
- If you choose to use a hardware authenticator, make sure it’s FIDO2 certified at Level 2 or higher.
- Secure your authenticator by enabling user verification – use a PIN, fingerprint, or Face ID to prevent unauthorized use.
- If secured with a PIN, make sure to follow basic security guidelines
- Avoid patterns (e.g. 123456 or 000000).
- Don’t reuse a PIN from another device or service.
- Avoid using personal information (like your birthdate).
Create and Use Passkeys
- Don’t try to immediately switch all accounts to passkeys. Begin with just one or two services to get a feeling for it.
- When offered, create a passkey instead of a password.
- Always verify the website before creating a passkey – double-check the URL to ensure you’re on the legitimate site and not a phishing page.
- Look for user verification during login – being asked to enter a PIN, scan your fingerprint, or use Face ID when signing in is a strong sign the service has implemented passkey authentication securely and correctly.
Backup and Recovery
- Never rely on just one passkey: Set up at least one additional login method (e.g. username, unique password + 2FA).
- Store backup credentials in a trusted password manager and use them exclusively for account recovery purposes.
- For critical accounts, consider registering a second hardware authenticator and storing it in a secure location.
Maintain Your Setup
- Remove unused or outdated passkeys from account settings.
- If your authenticator gets lost or stolen, immediately revoke it from your account settings.
Glossary of Key Terms
| Term | Explanation |
|---|---|
| Passkey | A modern replacement for passwords. It uses strong cryptography to log you in securely – no need to remember anything. |
| FIDO | Short for Fast Identity Online. A global industry standard for safer, passwordless login. Created by the FIDO Alliance. |
| FIDO Alliance | A group of companies (like Apple, Google, Microsoft) that create the rules and technology behind passkeys and secure logins. |
| Authenticator | A device or app that creates and stores your passkeys. This can be your operating system, phone, browser, or a USB security key. |
| User Verification Test | A way to confirm it’s really you using the passkey. This can be done with your fingerprint, face, or a PIN code. |
| User Presence Test | A simple check to make sure a real person is present—like touching a button or tapping your phone. It’s not the same as verifying your identity, just confirming someone is there. |
| PIN | Personal Identification Number. A short code you enter on your authenticator. |
| Resident Key (aka Discoverable Credential) | A passkey in which the private key and related metadata are stored directly on the authenticator, enabling the user to authenticate without entering any identifying information (such as a username). |
| Device-Bound Passkey | A passkey that is tied to one specific device or security key. It won’t sync across devices. More secure, but less convenient. |
| Synced Passkey / Multi-Device Credential | A passkey that lives in your credential manager (like iCloud or Google Password Manager) and works on all your devices. |
| Credential Manager | A secure app or service that stores your login info—like 1Password, Apple Keychain, Google Password Manager, or LastPass. |
| 2FA (Two-Factor Authentication) | An extra layer of security. Besides your password or passkey, you also need a code from an app or text message. |
| Brute Force Protection | A feature that blocks someone from guessing your PIN/password by trying lots of combinations. Usually built into authenticators or login applications. |
A small clarification : setting PIN using Windows control panel will fail if you have KB5062553 (or its replacements) installed
https://www.token2.swiss/site/page/blog?p=posts/93