 SuisseID is the first legally accepted, standardized, electronic identification hardware in Switzerland. Available since 2010 for any person living in Switzerland, it contains two X.509 certificates, one for authentication and one for qualified signatures. ‘Qualified’ in this regard means that is legally treated equally to a manual signature. This is especially interesting for signing contracts, emails and so forth.
The authentication certificate (IAC) can be used to login to services which support certificate based logins, or in other words, have a SuisseID interface. For people working in Unix environments it would be cool to allow OpenSSH authentication based on the SuisseID authentication certificate. Public Key based authentication is nothing new, however, usually you deal with software keys that lie around on your hard disk, which is an insecure environment by definition. Ideally, your private key would never leave its locked-up secure environment. That is where an HSM (Hardware Security Module) like SuisseID comes into place.
Let’s have a look on how simple it is to authenticate you against an OpenSSH server using SuisseID on an Ubuntu 12.04 client. The following examples assume you have a valid and properly initialized SuisseID, connected to your system, and also installed the required SuisseID software on your client.
After you have installed the SuisseID software from your Certificate Issuer (Swiss Post or QuoVadis), a shared library will have been installed that we’ll need in order to make OpenSSH authentication happen. The basic principle of a SuisseID based authentication is the same as with any common software key: You need to configure your server for public key authentication and copy the public key of your key pair to the server and store it within the file ~/.ssh/authorized_keys.
However, since the public keys are stored on the SuisseID HSM, you need to extract them first. There are two different methods:
- Extract and copy them manually
- Use ssh-agent and ssh-copy-id
Manual extraction
Manual extraction of the public keys is simple, but requires the latest version of OpenSSH (6.2) where the relevant command line option has been added. Note how the newly installed shared library of the Certificate Issuer is used here:
$ ssh-keygen -D /usr/lib/libcvP11.so
ssh-rsa  AAAAB3NzaC1yc2EAAAAFAK3XwvEAAAEBAJ9QMJc+ZZ0cGgiWJXNt6h0ta0
4axj/amX4QOnaH8CtGfQe97Jd7b1DcGM0KBA6iGPiU8/sh0nlj5Yr/KDmuso/tstCXc
p6cS5TX5rXCquzOSThJBN2TVE5jbi9CqwS6/8A1f31rWW5CWgCgUDpxyL6ST6qt3RJ2
FJedNR5uBSaAvtx41yhI7xcEQZOCB/PoNKcgEXOPZBlL07U0s/QeYi0YyL4QLZnk2Bi
uJyAWErqMmEQYUVxpb2Dshc3+grCvr2AI+VX2RDLfewe/CF2tfqaAb9c1E+LQKQCs/w
sOzNZ6DbAGbAOHHmCGsAlsrAGZHL2umXExRvuyYpxfs/Tnuek=
[…]
As soon as the above command has been invoked, the shared library accesses the SuisseID security device, asks for your PIN and retrieves the public keys, which can then be manually copied to the server as with any other public key.
Connecting to the server is now only a matter of using the correct ssh parameters to interface with your SuisseID upon login. This is done by invoking the PKCSProvider key word like so:
$ ssh –o PKCS11Provider=/usr/lib/libcvP11.so puffy.csnc.ch
If you are like me, you’ll be too lazy to remember the path and name of the shared library and you will create your own little ssh_config file for storing that information. That will automatically do the right thing when ssh’ing into ‘puffy’:
# ~/.ssh/config
Host puffy
	Hostname puffy.csnc.ch
	PKCS11Provider=/usr/lib/libcvP11.so
Using ssh-agent
Start the OpenSSH agent as usual and add your keys of the PKCS#11 container. Again, note how the shared library does the interfacing with your SuisseID:
$ eval `ssh-agent`
Agent pid 260

$ ssh-add -l
The agent has no identities.

$ ssh-add -s /usr/lib/libcvP11.so
Enter passphrase for PKCS#11:
Card added: /usr/lib/libcvP11.so

$ ssh-add -l
2048 6f:64:73:94:b9:cf:57:09:d6:0e:b5:c3:1c:2c:29:f6 /usr/lib/libcvP11.so (RSA)
2048 74:e8:81:b3:eb:a3:26:97:a4:36:b3:23:29:7c:15:83 /usr/lib/libcvP11.so (RSA)
2048 0b:79:e8:63:5b:ca:2c:ca:5a:fe:48:a5:b6:64:57:54 /usr/lib/libcvP11.so (RSA)
You can now simply use the command “ssh-copy-id” to transfer your public keys to the remote system:
$ ssh-copy-id puffy.csnc.ch
/opt/local/bin/ssh-copy-id: INFO: attempting to log in with the new key(s), to filter out any that are already installed
/opt/local/bin/ssh-copy-id: INFO: 3 key(s) remain to be installed -- if you are prompted now it is to install the new keys
[email protected]'s password:

Number of key(s) added:        3

Now try logging into the machine, with:   "ssh 'puffy.csnc.ch'"
and check to make sure that only the key(s) you wanted were added.
That’s all. Whenever you now want to ssh to your server and your SuisseID is connected to your computer, it will ask you for the PIN of the token and authenticates itself. No more passwords!
I’m a Mac!
In contrast to what the commercials make us believe, Mac users have to go an extra mile here. Apple has decided to get rid of PKCS#11 support in the OpenSSH version shipped with 10.8 (note the location of the required shared library on Mac OS X):
$ /usr/bin/ssh –I /usr/local/lib/libcvP11.dylib
no support for PKCS#11
Thus, you need to get yourself an uncut version through Macports. Afterwards, live is good:
$ sudo port selfupdate
----> Updating Macports base sources using rsync
MacPorts base version 2.1.3 installed,
MacPorts base version 2.1.3 downloaded.
----> Updating the ports tree
----> MacPorts base is already the latest version
[…]

$ sudo port install openssh
[…]
----> Installing openssh @6.2p1_0
----> Activating openssh @6.2p1_0
----> Cleaning openssh
[…]

$ /opt/local/bin/ssh –V
OpenSSH_6.2p1, OpenSSL 1.0.1e 11 Feb 2013
I’m a PC!
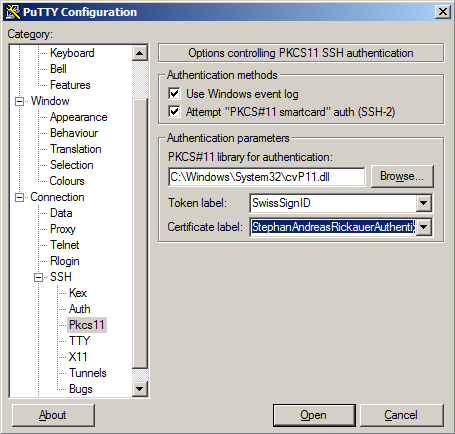
Windows users often use PuTTY in order to connect to OpenSSH servers. However, PuTTY does not come with PKCS#11 support by default. PuTTY-VX4 from Christian Kahlo is an extended edition and comes to the rescue, which is fully capable of using SuisseID as security device. The following screen shot shows the relevant configuration dialog under ‘Connection | SSH | Pkcs11’. Again, note the path of the shared library that you will need to provide:
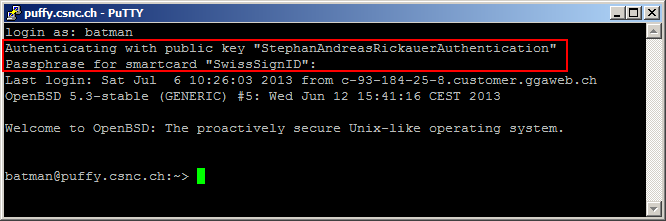
A successful ssh authentication on Windows may then look like this:
Leave a Reply