This post is intended to explain what you typically want to check for during an OpenID Connect assessment and also provide you with a guide to setup your own OpenID Connect test environment.
Terminology
Since the terminology of OAuth and OpenID Connect is not quite clear let’s agree on the same terminology first. In a typicaly OpenID connect setup we encounter three to four entitys.
- End-User, the user that owns a particular resource
- Relying Party, an application that access protected resources on behalf of the user
- OpenID Provider, server issuing access tokens and claims about the user
- Backend Service, server that is hosting the protected resource
What to look out for
Typically during an OpenID Connect assessment we consider following questions
- Is the correct flow used for the scenario/setup?
- Is TLS configured securly and are the certificate chains correctly validated?
- Are endpoint URLs checked by the OpenID Provider? (open redirection vulnerability)
- Are authorization grants invalidated after it’s first use?
- Are authorization grants expired after a few minutes?
- Are authorization grants and access tokens randomly generated and unpredictable?
- Are the JWT’s properly secured? (Strong algorithms, keys, signature verification etc.)
If you can answer all aboves question with “yes”, good for you! If you don’t know how to test these things let’s setup our own test environment.
Your own Playground
As a base installation we can recommend Ivans guide over at GitHub. It utilized Keycloak as an OpenID Connect provider and also demonstrates how to add authentication to an application that does not come with any. But since the goal is to understand and comprehend the whole OpenID Connect flow we need to extend his setup with an additional relying party and proxy everything through Burp.
Enhance
For the additional relying party we will use Curity’s example Python OpenID Connect Client. It is a python application that we can easily modify to our needs.

Configuration and installation
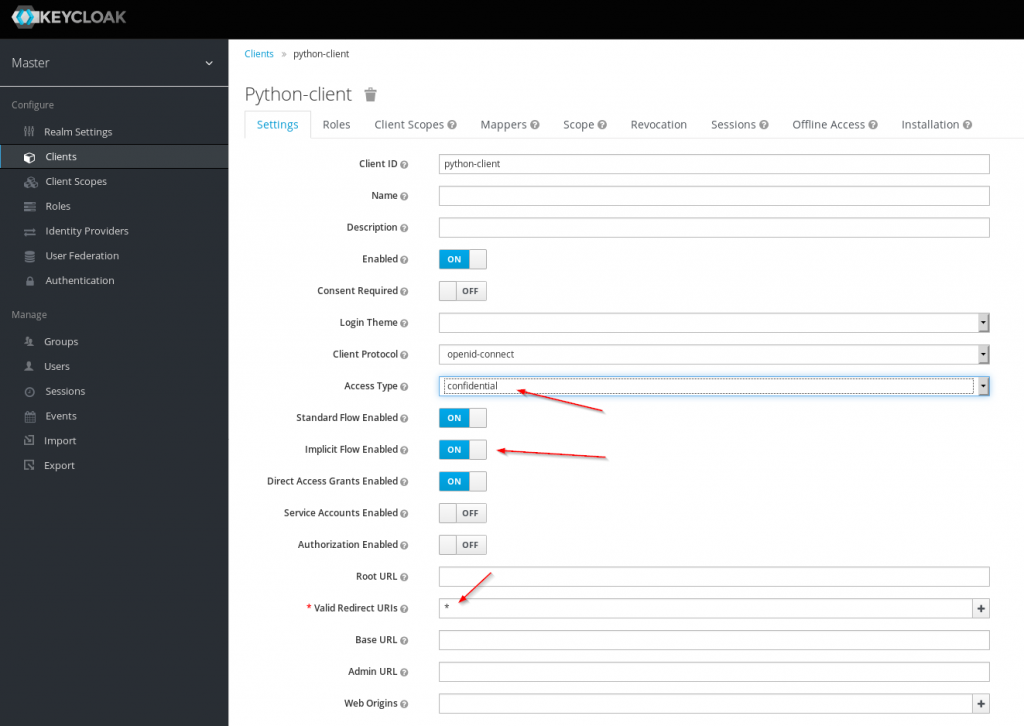
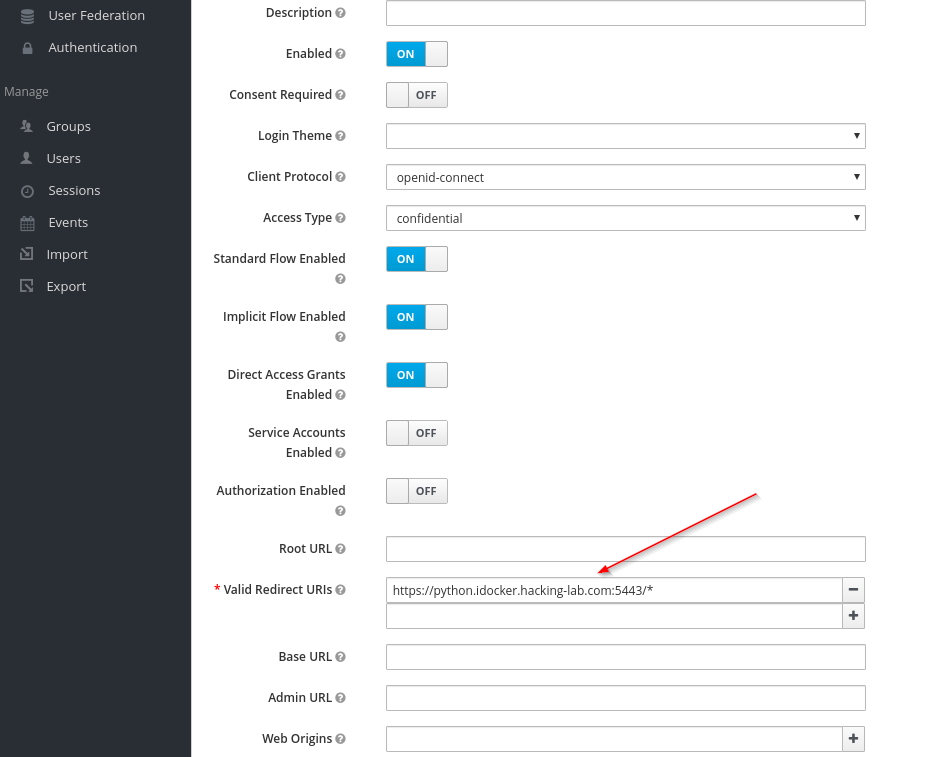
First add a new client with the name python-client to your Keycloak setup. Set access type to confidential, activate Implicit Flow and set the Valid Redirect URIs to *.
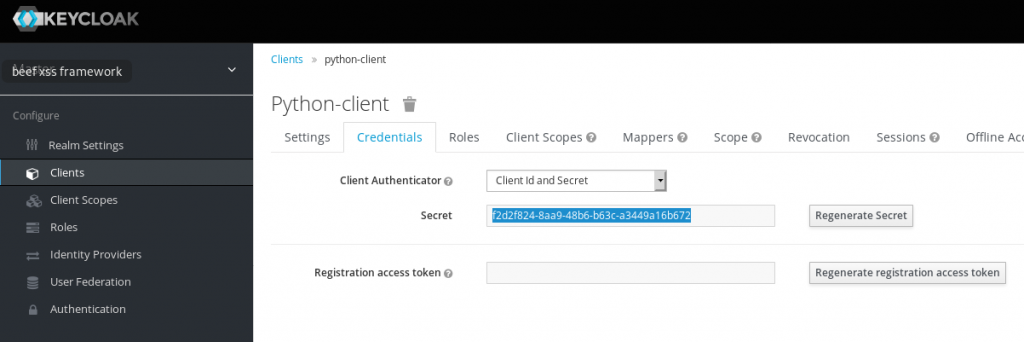
Copy the secret for the new client
Since localhost will not be forwarded through Burp we will need to add a new hostname to the /etc/hosts file
# echo "127.0.0.1 python.idocker.hacking-lab.com" >> /etc/hostsGet your local copy of the python example client
# git clone https://github.com/curityio/example-python-openid-connect-client Modify the settings.json file, change the values for issuer, client_id and client_secret. Also add base_url to the configuration.
issuer: https://auth.idocker.hacking-lab.com/auth/realms/master
client_id: python-client (if you chose the same as in the example above)
client_secret: your secret
base_url: https://python.idocker.hacking-lab.com:5443
Example configuration:
{
  "logout_endpoint": "https://localhost:8443/dev/authn/authenticate/logout",
  "issuer": "https://auth.idocker.hacking-lab.com/auth/realms/master",
  "base_url": "https://python.idocker.hacking-lab.com:5443",
  "api_endpoint": "http://localhost:5555/hello_world",
  "verify_ssl_server": false,
  "debug": true,
  "scope": "openid profile email address phone",
  "send_parameters_via": "query",
  "client_id": "python-client",
  "client_secret": "f2d2f824-8aa9-48b6-b63c-a3449a16b672",
  "request_object_key": {
    "kty": "RSA",
    "n": "0vx7agoebGcQSuuPiLJXZptN9nndrQmbXEps2aiAFbWhM78LhWx4cbbfAAtVT86zwu1RK7aPFFxuhDR1L6tSoc_BJECPebWKRXjBZCiFV4n3oknjhMstn64tZ_2W-5JsGY4Hc5n9yBXArwl93lqt7_RN5w6Cf0h4QyQ5v-65YGjQR0_FDW2QvzqY368QQMicAtaSqzs8KJZgnYb9c7d0zgdAZHzu6qMQvRL5hajrn1n91CbOpbISD08qNLyrdkt-bFTWhAI4vMQFh6WeZu0fM4lFd2NcRwr3XPksINHaQ-G_xBniIqbw0Ls1jF44-csFCur-kEgU8awapJzKnqDKgw",
    "e": "AQAB",
    "d": "X4cTteJY_gn4FYPsXB8rdXix5vwsg1FLN5E3EaG6RJoVH-HLLKD9M7dx5oo7GURknchnrRweUkC7hT5fJLM0WbFAKNLWY2vv7B6NqXSzUvxT0_YSfqijwp3RTzlBaCxWp4doFk5N2o8Gy_nHNKroADIkJ46pRUohsXywbReAdYaMwFs9tv8d_cPVY3i07a3t8MN6TNwm0dSawm9v47UiCl3Sk5ZiG7xojPLu4sbg1U2jx4IBTNBznbJSzFHK66jT8bgkuqsk0GjskDJk19Z4qwjwbsnn4j2WBii3RL-Us2lGVkY8fkFzme1z0HbIkfz0Y6mqnOYtqc0X4jfcKoAC8Q",
    "p": "83i-7IvMGXoMXCskv73TKr8637FiO7Z27zv8oj6pbWUQyLPQBQxtPVnwD20R-60eTDmD2ujnMt5PoqMrm8RfmNhVWDtjjMmCMjOpSXicFHj7XOuVIYQyqVWlWEh6dN36GVZYk93N8Bc9vY41xy8B9RzzOGVQzXvNEvn7O0nVbfs",
    "q": "3dfOR9cuYq-0S-mkFLzgItgMEfFzB2q3hWehMuG0oCuqnb3vobLyumqjVZQO1dIrdwgTnCdpYzBcOfW5r370AFXjiWft_NGEiovonizhKpo9VVS78TzFgxkIdrecRezsZ-1kYd_s1qDbxtkDEgfAITAG9LUnADun4vIcb6yelxk",
    "dp": "G4sPXkc6Ya9y8oJW9_ILj4xuppu0lzi_H7VTkS8xj5SdX3coE0oimYwxIi2emTAue0UOa5dpgFGyBJ4c8tQ2VF402XRugKDTP8akYhFo5tAA77Qe_NmtuYZc3C3m3I24G2GvR5sSDxUyAN2zq8Lfn9EUms6rY3Ob8YeiKkTiBj0",
    "dq": "s9lAH9fggBsoFR8Oac2R_E2gw282rT2kGOAhvIllETE1efrA6huUUvMfBcMpn8lqeW6vzznYY5SSQF7pMdC_agI3nG8Ibp1BUb0JUiraRNqUfLhcQb_d9GF4Dh7e74WbRsobRonujTYN1xCaP6TO61jvWrX-L18txXw494Q_cgk",
    "qi": "GyM_p6JrXySiz1toFgKbWV-JdI3jQ4ypu9rbMWx3rQJBfmt0FoYzgUIZEVFEcOqwemRN81zoDAaa-Bk0KWNGDjJHZDdDmFhW3AN7lI-puxk_mHZGJ11rxyR8O55XLSe3SPmRfKwZI6yU24ZxvQKFYItdldUKGzO6Ia6zTKhAVRU",
    "alg": "RS256",
    "kid": "2011-04-29"
  }
}
Try to start the application
# python app.pyIf you get the following error follow the next step, otherwise jump ahead
SSLError: [SSL: EE_KEY_TOO_SMALL] ee key too small (_ssl.c:2784)The key for the certificate on the website is too small. So we need to generate a new certificate in the keys directory
# cd keys
# mv localhost.pem localhost.pem_old
# openssl req -newkey rsa:2048 -new -nodes -x509 -keyout localhost.pem -out
Generating a RSA private key
................................................................................+++++
......................+++++
writing new private key to 'localhost.pem'
-----
You are about to be asked to enter information that will be incorporated
into your certificate request.
What you are about to enter is what is called a Distinguished Name or a DN.
There are quite a few fields but you can leave some blank
For some fields there will be a default value,
If you enter '.', the field will be left blank.
-----
Country Name (2 letter code) [AU]:CH
State or Province Name (full name) [Some-State]:
Locality Name (eg, city) []:
Organization Name (eg, company) [Internet Widgits Pty Ltd]:
Organizational Unit Name (eg, section) []:
Common Name (e.g. server FQDN or YOUR name) []:python.idocker.hacking-lab.com
Email Address []:
# cat cert.pem >> localhost.pem
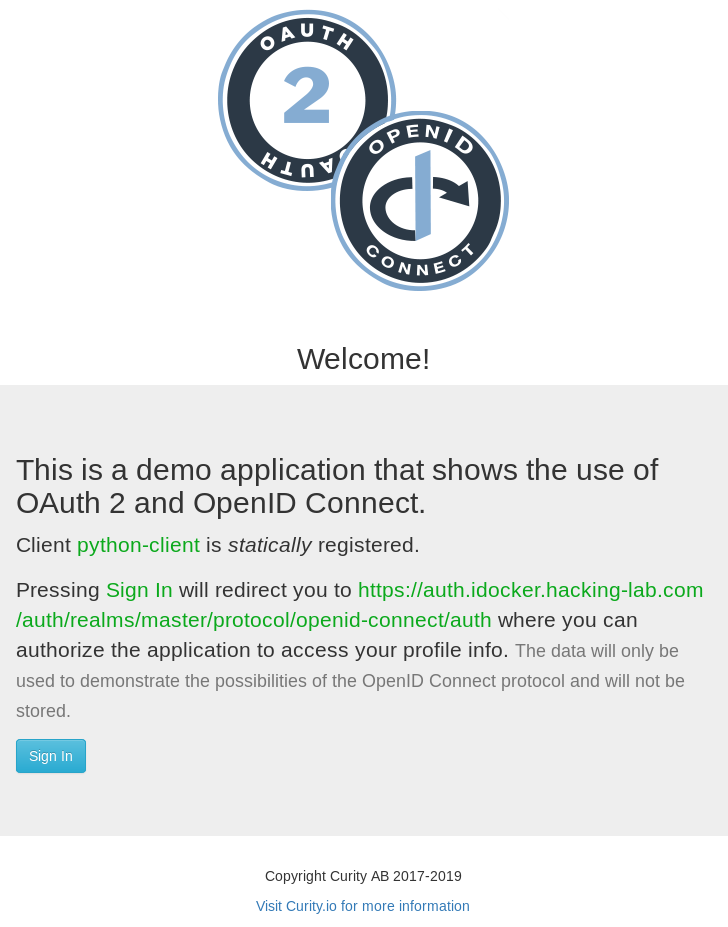
# python ../app.pyYou should now be able to connect to the python client via your browser https://python.idocker.hacking-lab.com:5443
Burp all the things
Depending on the OpenID Connect flow type we can not inspect all calls, namely the communication between the relying party and the OpenID connect provider. Luckily, we can add Burp to the python client.
Add following line at the start of your client.py. Replace the proxy address depending on your Burp setup.
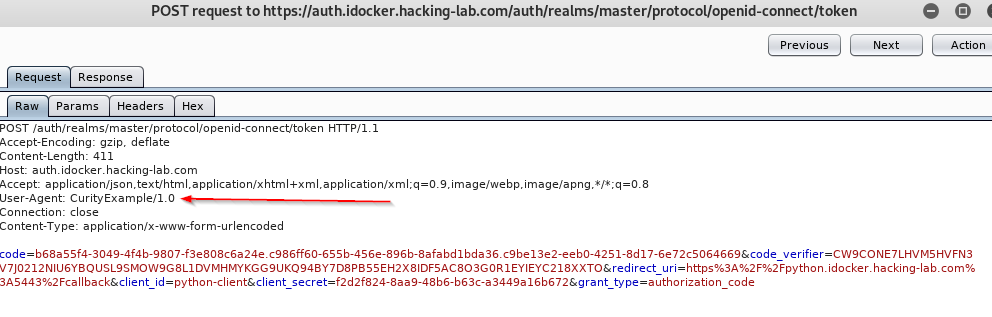
os.environ['https_proxy'] = '127.0.0.1:8080'After that restart the app.py and try to login. In your Burp state you should see backend calls from python to Keycloak. They can be easily identified by the user-agent header CurityExample/1.0.
Checking for vulnerabilities
Now that we have a complete setup we can try to identify some of the above mentioned vulnerabilities. Let’s try an easy one.
Open redirection vulnerability
The OpenID Connect flow utilizes HTTP redirects to direct the browser to the OpenID provider and back to the relying party after a successful login. If an attacker can forge a link that redirects not back to the relying party but instead to his malicious page, he is able to perform a nasty phishing attack.
This is the first GET request that is made to the OpenID provider. It contains a parameter called redirect_uri.
https://auth.idocker.hacking-lab.com/auth/realms/master/protocol/openid-connect/auth?nonce=PPZH9RELVL5BZKSCK47O&code_challenge=zIi_hnKJZIBz9Nm6DbVM-gMI3HaWYFYulnslkqW_ItA&client_id=python-client&state=G6XMT7QEJ1R97L5XFL0I&redirect_uri=https%3A%2F%2Fpython.idocker.hacking-lab.com%3A5443%2Fcallback&response_type=code&code_challenge_method=S256&scope=openid+profile+email+address+phoneIf the parameter is changed to a different value it should be blocked by the OpenID provider. In the example below the redirect_uri parameter has been changed to www.compass-security.com. As you can see below the redirect to the site does work after a sucessfull login.
https://auth.idocker.hacking-lab.com/auth/realms/master/protocol/openid-connect/auth?nonce=PPZH9RELVL5BZKSCK47O&code_challenge=zIi_hnKJZIBz9Nm6DbVM-gMI3HaWYFYulnslkqW_ItA&client_id=python-client&state=G6XMT7QEJ1R97L5XFL0I&redirect_uri=https%3A%2F%2Fwww.compass-security.com&response_type=code&code_challenge_method=S256&scope=openid+profile+email+address+phone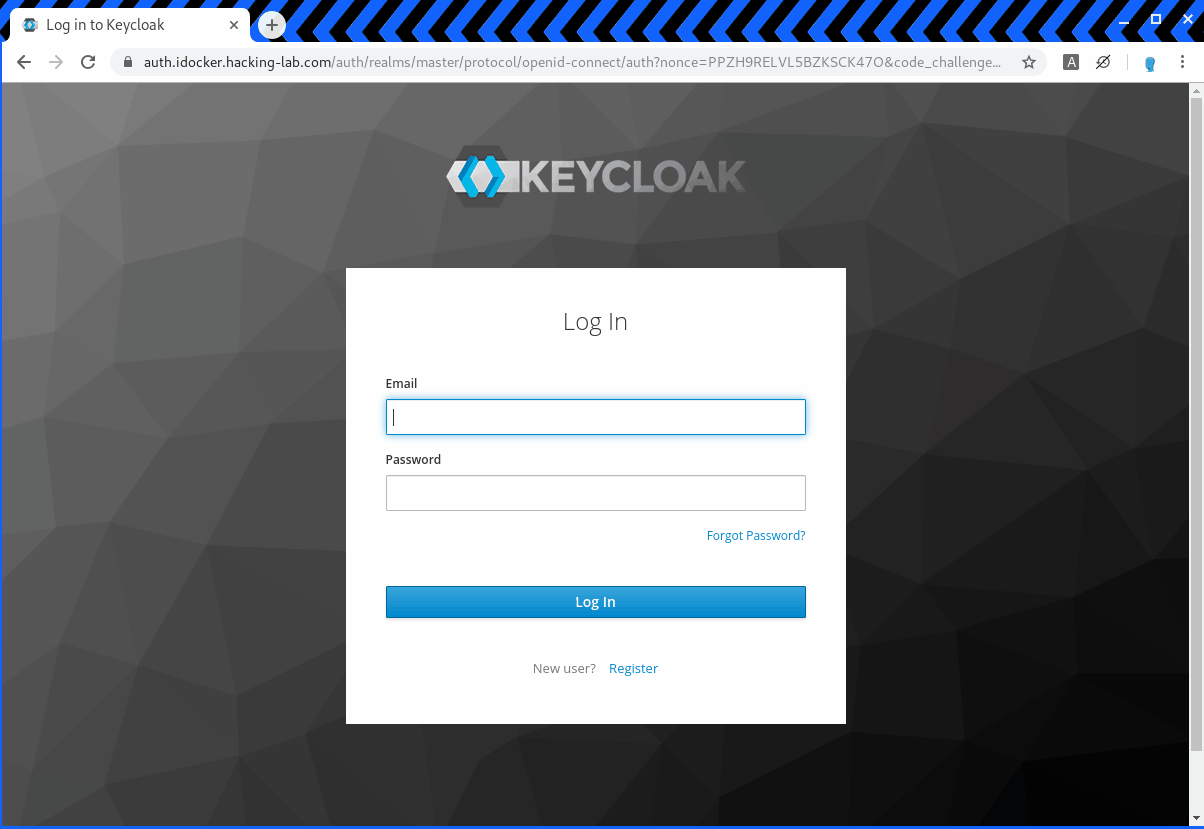
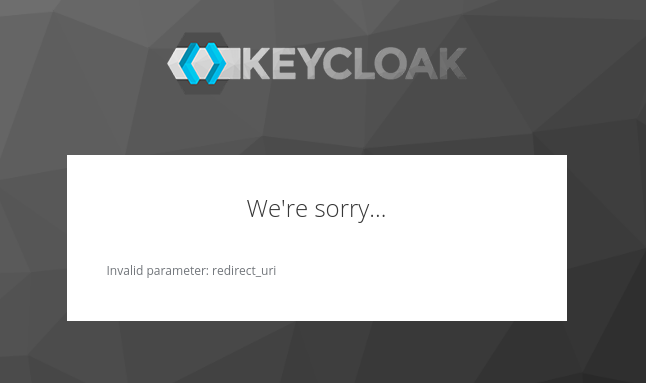
So we have clearly an open redirection vulnerability, but how can we fix it? Maybe you noticed the parameter Valid Redirect URIs in the Keycloak client configuration. It is set to * which is the reason why the vulnerability exists. Change the * to https://python.idocker.hacking-lab.com:5443/* to mitigate the attack.
If we try again to change the redirect_uri Keycloak will block our request.
Conclusion
Ivan’s guide over at GitHub makes for a nice setup in order to learn about OpenID Connect and related issues. If you are keen to hear more on OAuth 2, OpenID Connect and the latest web issues – stay tuned. We are in turn to announce an overhauled web application security class soon.
Leave a Reply