This post provides ideas of processes to follow and gives basic guidance on how to collect, triage and analyze artifacts using Velociraptor.
Incident Response Methodology
In order to handle a typical DFIR case, a methodology is required. There are two de-facto incident response methodologies, SANS and NIST, which are very similar and almost interchangeable. For the typical DFIR case, the process as laid out by NIST in the Computer Security Incident Handling Guide is sufficient.
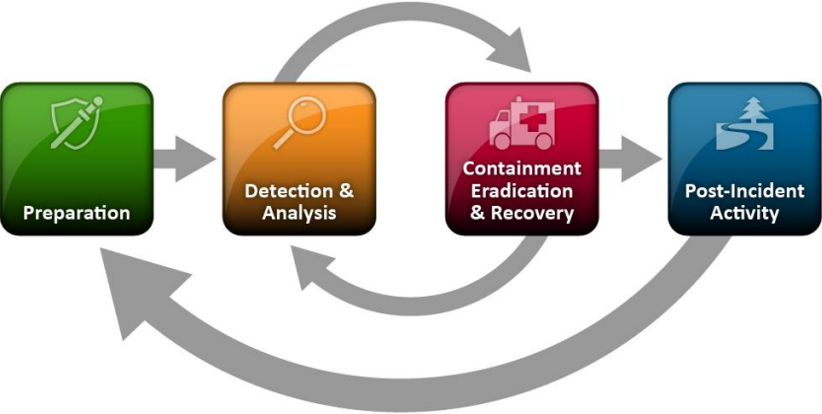
In all phases of the incident, it is furthermore important to keep documentation of all performed steps, meetings and obtained evidence.
Preparation and Tooling
Many organizations nowadays have custom strategies and procedures for incidents at their disposal. If there are none, the Incident Response Methodologies of CERT Societe Generale may provide a good starting point.
Aside from organization level preparations, such as the prevention of incidents and general forensic readiness, tooling is a major point to consider.
We are used to analyze the typical incident using a variety of tools, such as The Sleuth Kit, Eric Zimmerman’s Tools, X-Ways Forensics, Plaso, Timesketch, KAPE, AXIOM and others. All these tools certainly served us well. However, most of them have also drawbacks, such as being slow, limited support, costly, cumbersome to master and more. Certainly, it would be nice to have a single tool, which integrates the main functionality required to solve the typical case as well as allow for customization and extensibility.
This is why, nowadays we mainly try to focus on Velociraptor. Velociraptor is a tool for collecting live information via client-server model architecture using its own Velociraptor Query Language (VQL). It is built to work on multi-platform environments and comes with a handy web interface for analysts to investigate a case in collaboration.
Whenever a new incident is reported, we spin-up an incident infrastructure allowing all involved parties to safely communicate, exchange incident data and keep a logbook. The Velociraptor server instance is part of and fully integrated trough it’s API into this infrastructure.
Velociraptor clients are automatically generated, and a deployment process is chosen depending on customer requirements. In most cases, GPOs are used to distribute the Velociraptor clients in the compromised infrastructure.
Even if it is not possible to deploy applications in client-server mode to a customer infrastructure or specific endpoint, Velociraptor can perform the task.
By selecting the desired forensic evidence to collect (such as from the well-known KapeFiles Repository), an offline collector can be built. Such an offline collector comes as a single standalone Velociraptor executable, which can be transferred to a host over an arbitrary method. Upon execution, the desired forensic evidence is collected from the device into an archive, which then can be either analyzed separately or imported back into a Velociraptor server.
Especially for an initial triage, we often use preconfigured offline collectors. Furthermore, since lately it also possible to use Velociraptor in a more traditional post-mortem disk forensics scenario.
Try Velociraptor Now
In the simplest case, Velociraptor can be simply started. We encourage the reader to download the Velociraptor executable from their official GitHub repository and to run it using the following command from an elevated terminal:
.\velociraptor-v0.6.x-windows-amd64.exe gui
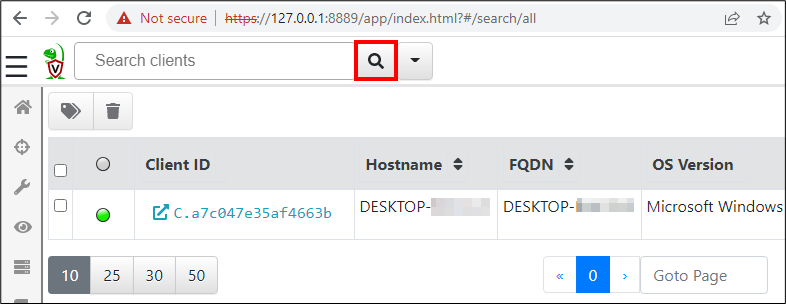
Velociraptor should now greet the user with the main overview. When clicking on the magnifying glass icon in the top, the list of connected clients is shown. In this case, there will be only one
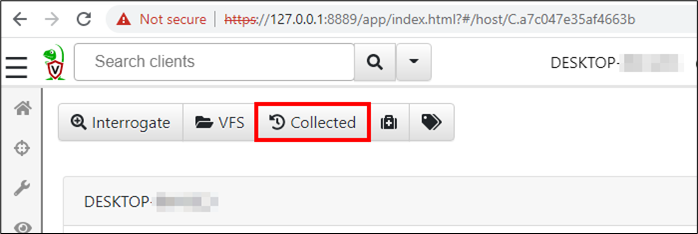
When clicking the client id, further information is revealed.
Detection and Analysis
As already described, our customers have detected and assessed a possible incident almost exclusively before we even get contacted, why we won’t get into the initial detection further in this article.
When an initial detection has been successful, we advise to verify new leads first, as we have observed several occasions, where the initial indication was either not accurate or not related to an attack.
But how to start an analysis given a lead?
Consider a scenario where an Antivirus or EDR detected a suspicious running process or library on a machine. Let’s assume the detected process is named something like ‘velociraptor’.
On the client view of the started Velociraptor instance, click the Collected button.
From here, it is possible to run a query on the single connected client. Queries use the Velociraptor Query Language (VQL) and are packaged together into what is called an artifact. Such an artifact is ready to be sent to the connected clients and after execution returns its results to the server. Almost every artifact returns results in form of a table. Velociraptor already has a lot of built-in artifacts available and there are even more ready to be downloaded from the Artifact Exchange.
Considering our example, let’s obtain a list of processes via an artifact. Start by selecting the plus icon (+) and enter Windows.System.Pslist into the search field. Don’t forget to select the artifact by clicking on it (it gets highlighted).

Next, click the Configure Parameters tab and use the settings button of the Windows.System.Pslist artifact.
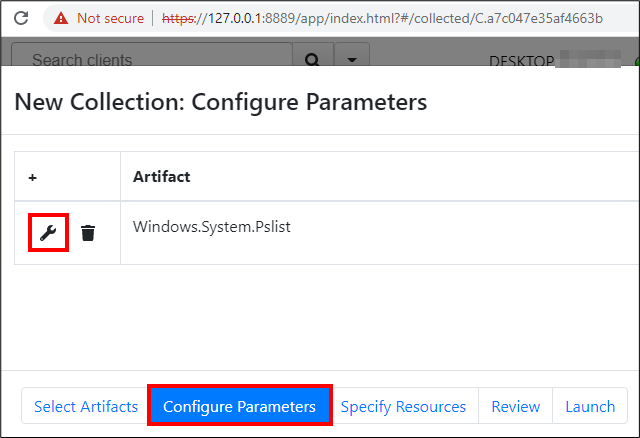
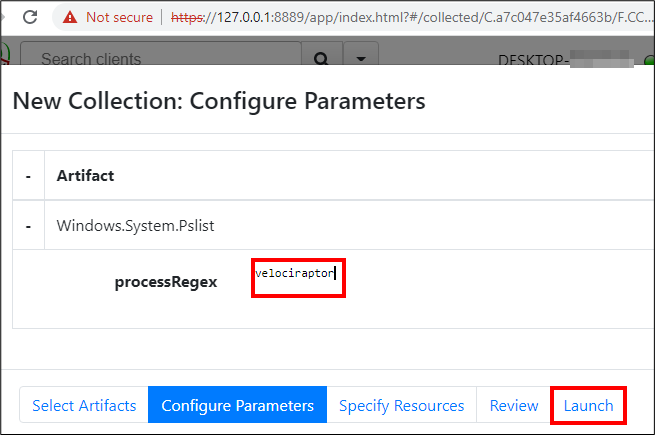
Replace the processRegex by entering ‘velociraptor’ and click Launch.
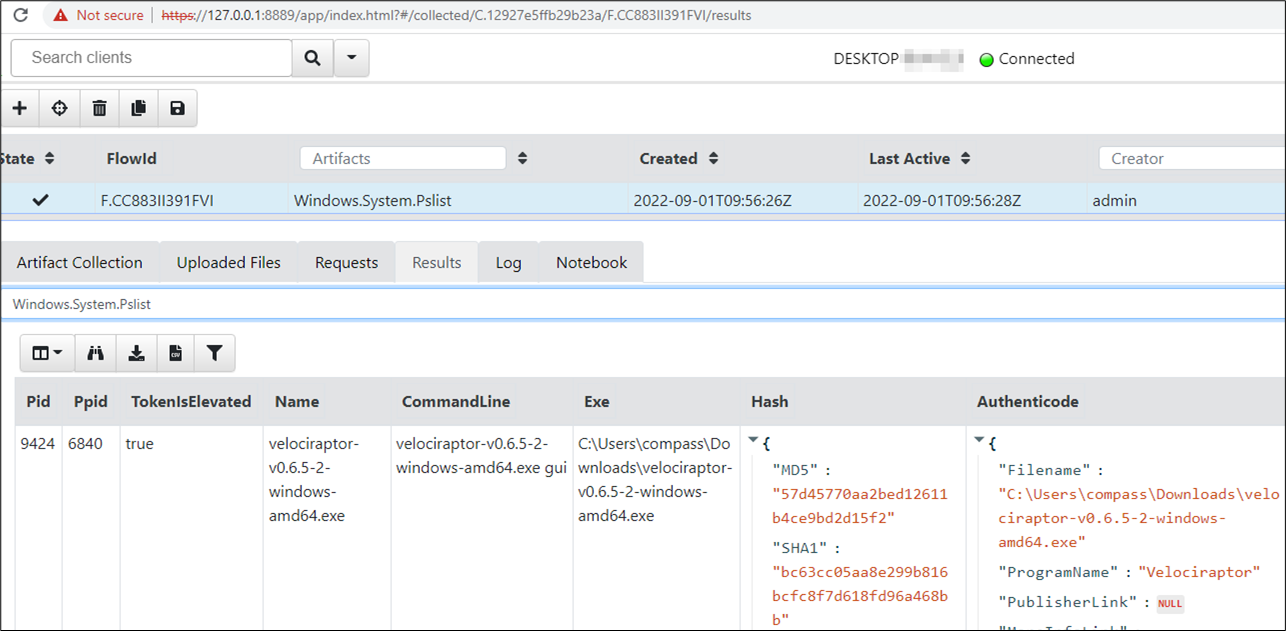
In the Results tab of the collection, there is important information about the process, such as its parent process id, command line and hashes, which can be used (for a simple lookup on eg. VirusTotal) to gain more information about the executables.
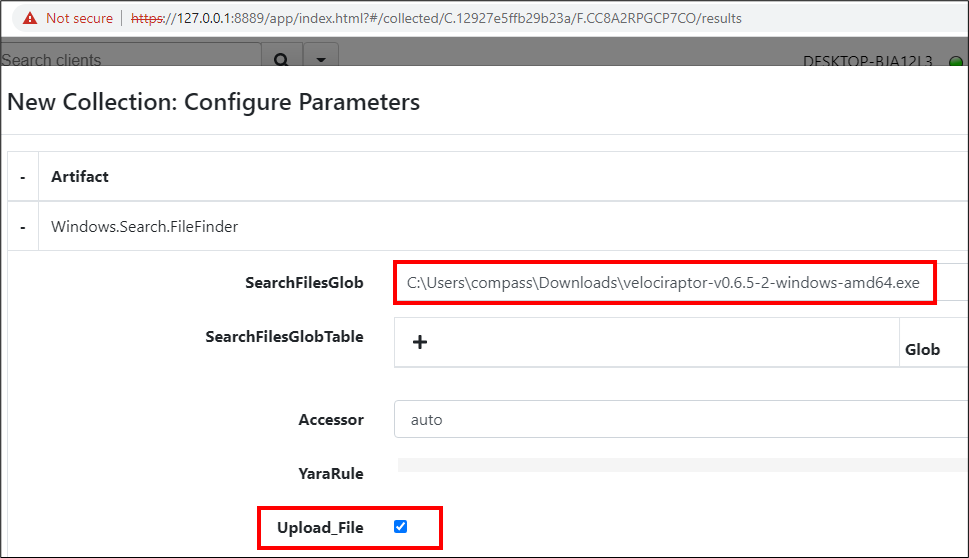
At this point, we know the exact file name of the executable, but it usually sits on a client device somewhere in the network. For an investigation, we would like to obtain the file and furthermore, get some insights on when the file was first observed.
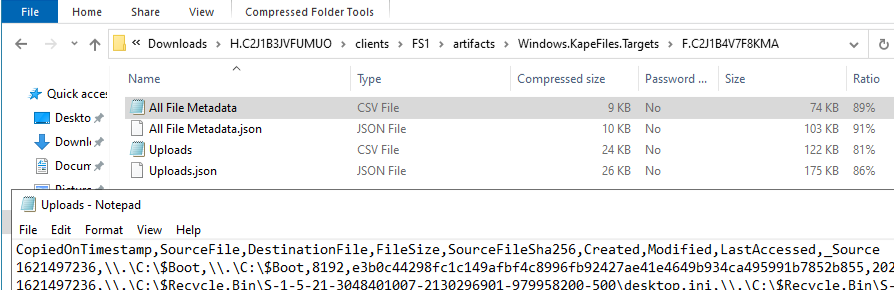
A new artefact collection can be started by again using the plus icon (+) with the artifact Windows.Search.FileFinder. In the Parameter Configuration, the SearchFilesGlob can be adjusted to the path of the executable and Upload_File can be selected.
This same technique can be used to search for a file on all connected clients by simply adjusting the SearchFilesGlob to use a wildcard. However, the returned data is twofold:
- For one, the file in question is obtained from the client and made available under the Uploaded Files tab for download and further investigation.
- Secondly, file timestamps were made available in the Results tab.
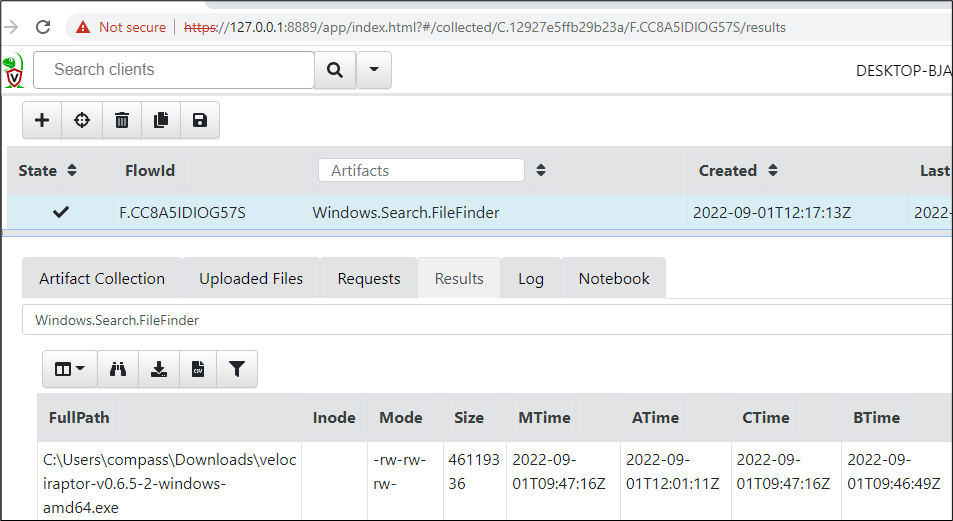
The NTFS filesystem used in most Windows installations provides four types of timestamps:
• MTime – Modified
• ATime – Accessed
• CTime – Changed
• BTime – Birth (When the file was created)
The obtained timestamps provide an indication on when the executable may have been downloaded (BTime) and last executed (ATime). Note, that these timestamps may have been tampered with.
If we would like to know more about the execution, such as time of first execution or the number of executions, we have to look into operating system features that provide us with evidence of execution.
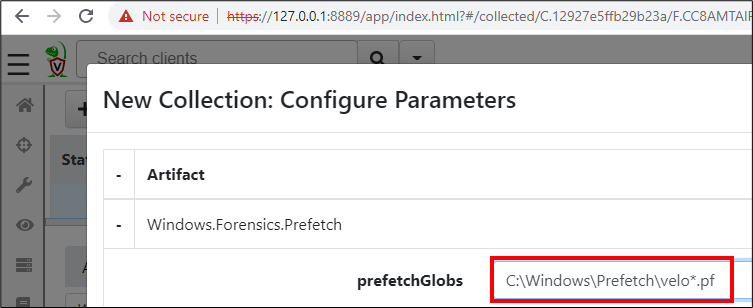
Luckily, Velociraptor comes with an artifact fitted for such a task: Windows.Forensics.Prefetch. This artifact parses files from the Directory C:\Windows\Prefetch, which are generated by the Windows operating system upon start of executables mostly for caching and performance improvement. For a forensic analysis, these files may provide the exact time of up to eight executions for a single executable.
For the Configuration Parameters, we can use ‘C:\Windows\Prefetch\velo*.pf’:
From the Results tab, in the LastRunTimes and RunCount columns, it is then visible when the executable was executed:

Another useful artefact for the current investigation is Windows.Analysis.EvidenceOfDownload, which provides the URL where the file was downloaded from and the and ReferrerUrl, which is holding the download link.
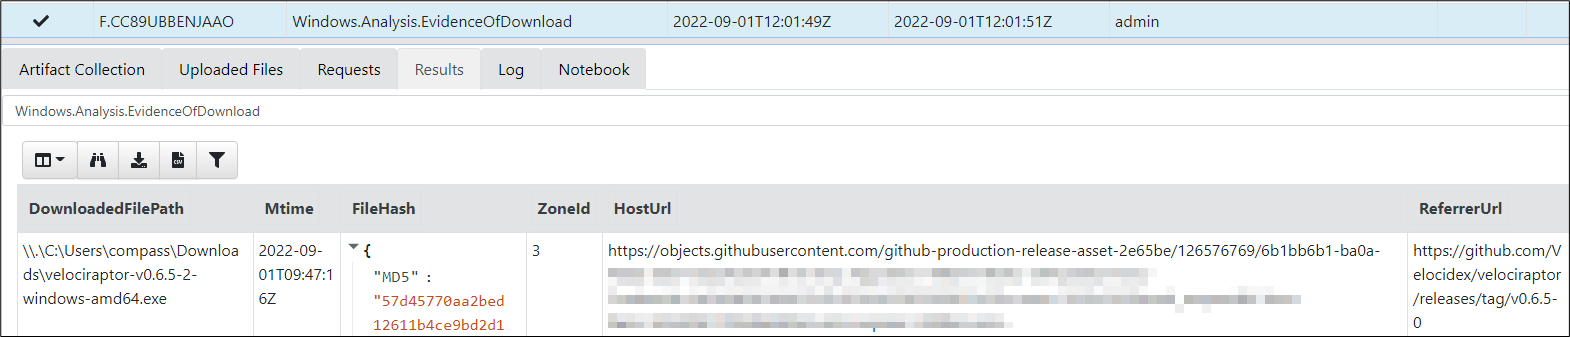
This artifact is reading from an NTFS feature called Alternate Data Stream (ADS) allowing for more than one data stream to be associated to a filename. All major programs write such an ADS named “Zone Identifier” also called Mark-of-the-Web (MOTW) upon download of a file.
Often attackers use persistence mechanisms to maintain access into a system even after reboots. Velociraptor has various artifacts to detect persistence, such as for registry keys Windows.Sys.StartupItems or for scheduled tasks Windows.System.TaskScheduler.
Another big part of the analysis relies on Windows Event Logs, for example the detection of lateral movement. Velociraptor has many well-designed Windows.EventLogs artifacts, to facilitate such analysis like Windows.EventLogs.RDPAuth or Windows.EventLogs.AlternateLogon.
After the detection and analysis phase has revealed compromised hosts and accounts as well as the scope of the incident, the next phase can be started.
Containment, Eradication & Recovery
Common strategies of organizations include the following containment procedure: After an initial detection, the employee has to turn off his computer or laptop device.
Although the best containment strategies vary based on the type of incident, we would generally not recommend the before mentioned procedure. This is because in case of a computer shut down, all data in volatile memory is immediately lost. We would therefore argue in favor of containment trough network isolation or system hibernation.
However, as pulling the network plug from a computer makes it also unavailable for a remote analysis, the best option is to move the host into an isolated network zone. Such an isolation can also be performed in a second phase after having pulled the network plug, which allows for both: simpler containment procedures for employees and faster reaction time.
Velociraptor has several artifacts, which help in the Containment and Eradication phases as well. For example, the artifact Windows.Remediation.Quarantine can be used to isolate a host via firewall blocking of network communications. The artifact Windows.Remediation.ScheduledTasks can be used to remove scheduled task persistence from a host.
From a business perspective, the first priority after an incident is a quick recovery. Although the incident response process is an iterative process and analysis is certainly possible after containment or even recovery, it is valuable to gauge the full scope of the incident first. This is due to an attacker still being present in the systems may act accordingly to incomplete remediation attempts.
Note: A full network overview as well as the possibility to verify the containment may be helpful here. We have handled multiple cases, where the IT department stated all access to and from the Internet is restricted and a later analysis or later attacker actions determined that there were still available routes.
Depending on the compromise, it may be necessary to reset passwords, restore backups or in the worst case even rebuild the domain to fully remediate an attack.
When the incident has been fully remediated, it is vital not to forget post incident activities.
Post Incident Activity
What are the lessons learned from the incident?
Our incidents almost always result in a proper list of proposed measures for the best remediation but also the future protection and improvement of defenses and detection capabilities.
Often the proposed measures in the protection area fall into the category of best practices, such as from the Security Best Practices for On-Premises Environments or Password Security.
Technical measures in the detection area mostly consist of increased logging and monitoring capabilities as well as general forensic readiness.
You feel this blog post merely scratches the surface and want to dig deeper?
Check out our new hands-on training, where you will learn to detect adversary actions and remediate a full-blown cyber incident. In the new web-based windows enterprise course lab. You will be able to try and apply all taught skills in a practical manner.
Next 4-days DFIR training starts November 29th (close to Zurich main station).
Seats are limited. Sign-up now.
https://www.compass-security.com/en/trainings/digital-forensics-and-incident-response/zurich-2022
External References
[1] SANS Cycle https://www.sans.org/media/score/504-incident-response-cycle.pdf
[2] NIST Guide https://nvlpubs.nist.gov/nistpubs/specialpublications/nist.sp.800-61r2.pdf
[3] Societe Generale Playbooks https://github.com/certsocietegenerale/IRM
[4] Velociraptor https://github.com/Velocidex/velociraptor
[5] The Sleuth Kit https://www.sleuthkit.org/
[6] Eric Zimmerman’s Tools https://ericzimmerman.github.io/#!index.md
[7] X-Ways Forensics http://www.x-ways.net/
[8] Plaso https://github.com/log2timeline/plaso
[9] Timesketch https://timesketch.org/
[10] KAPE https://www.kroll.com/en/insights/publications/cyber/kroll-artifact-parser-extractor-kape
[11] AXIOM https://axiomforensic.com/
[12] KapeFiles Repository https://github.com/EricZimmerman/KapeFiles
[13] VirusTotal https://www.virustotal.com/
Leave a Reply